JI1FGX/DU9 Amateur Radio Diary, Mindanao, Philippines, IOTA OC-130
English Japanese


Yesterdays access
Page Top [Lily Diary.】
A diary of life in Mindanao.
26/11/07  SatBox_Ver0.1.1c-beta IC-9700 Test VersionUpdated
26/11/07  SatBox User GuideUpdated
26/11/03 An FT-847 for SatBox DevelopmentUpdated
26/11/02 Buying a ZT219 Digital MultimeterUpdated
26/10/28  Building a home server using Linux
26/10/27  Repeater Controller Features and Settings
26/10/27  Repeater Controller Board and Firmware
26/10/26  JTDX Auto Run Ver0.7.7Updated
26/10/26  WSJT-X Auto Run Ver0.1.6Updated
26/10/22  Memories of UNIX and Networking from My Yonezawa Ham Shack
26/10/20  Acquiring a YAESU FT-2600M for a Repeater
26/10/19  Rotator Relay Interface for Sale
26/10/18  Kenpro Rotator Interface KiCAD DATA
26/10/17  JOTA in Indonesia: Jamboree on the Air
26/10/17  You Can Now Leave Comments
26/10/11  Installing Arduino IDE
26/10/09  DXCC200 Sticker Arrives from ARRL
26/10/08  SatBox Cloud Released
26/10/06  Bought an ECS LIVA Z Mini PC on Yahoo Auctions
26/10/05   QSO with C5R in The Gambia
26/10/04  Installing Raspberry Pi OS
26/10/02  Repeater Controller Features and Settings
26/10/01  Repeater Controller Board and Firmware
26/09/30  Ordering PCBs and Assembly from JLCPCB
26/09/24  UNITRUST Electronics Parts Shop
26/09/22  Kenpro Rotator Interface
26/09/18  SatBox KiCad PCB and firmware
26/09/14  designed a circuit board for SatBox
26/09/12  Solar Power System Plan
26/09/09  Satellite SatBox Part 4
26/09/04  My grandson Zion
26/08/29  Ham Fair 2026 to be held
26/08/25  QSO with RI1FJL from Franz Josef Land
26/08/23  Satellite QSO via RS-44
26/08/22  Currently, Satellite VUCC46
26/08/16  Satellite SatBox Development in Progress - Part 3
26/08/05  IC-820H Receiver Sensitivity Test
26/08/02  Satellite SatBox Development in Progress - Part 2
26/07/16  Delivery of the 3D printed panels
26/07/09  Development of SatBox for satellites
26/07/05  Weather Monitor Indoor Unit
26/06/30  Creating data for 3D printers using FreeCAD
26/06/16  Installing an AS5600 magnetic encoder on a KR-500.
26/06/05  Grandson Zion's CQ
26/06/04  Replacing the potentiometer on the KR-500 elevation rotator
26/06/03 Making a Repeater Controller Pert4
26/06/01   Weather Monitor software
26/05/31   Weather Monitor
26/05/21   JTDX Auto Run BUGFIX
26/05/17  Repair of satellite antenna system
26/05/13  Repair of Alinco DR130
26/05/07  Making a Repeater Controller Pert3
26/05/03  Indonesian satellite friend YC8RPK
26/04/26  DXCC200 achieved
26/04/23  Communication via ISS voice repeater
26/04/20  WSJT-X Auto Run Ver0.1.5
26/04/19  Got an Alinco DR-130
26/04/15  Clublog Charts
26/04/10  Regarding POC transceivers
26/04/08  Using KENWOOD AT-300 with YAESU radio
26/03/17  How to establish a radio club in the Philippines
26/03/10  KENWOOD AT-300 with YAESU radio
26/02/27  Philippine NTC Amateur Radio License Examination Question Bank
26/02/20  Package received from JK1SNS
26/02/18  Temporary License Renewal
26/02/14  Satellite Tracking Software SatTrack
26/02/05  Making a Repeater Controller Pert2
26/02/02  CQ on satellite IO-86
26/01/27  Shack & Repeater Controller
26/01/16  Making a Repeater Controller
26/01/16  Making aRotator Interface PCB
26/01/10  Satellite antenna installation
26/01/08 WSJT-X Remote Operation
26/01/07 JTDX Remote Operation
26/01/04  log_reciver_Ver2.6.6
26/01/04  Tailscale VPN software for JTDX_Remote

Online Multiple Choice Reviewers to
the Phil Amateur Radio Examination
by 4F3EW


A joint project by JI1FGX/DU9 and DV9JRD
Ubuntu Server on ECS LIVA Z: SatBox Remote Access and Printer Sharing (October 28, 2026)
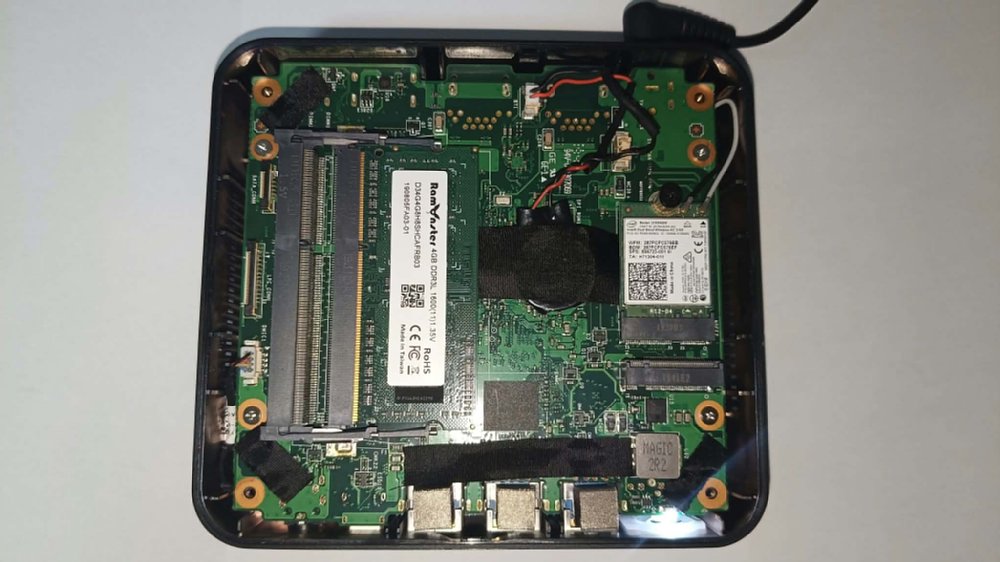
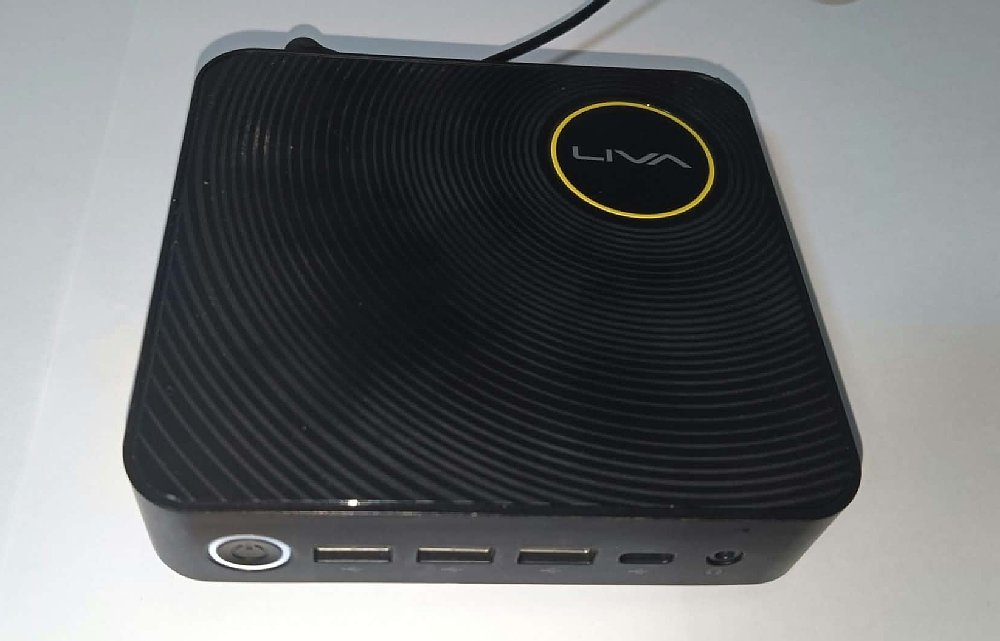
I bought this compact ECS LIVA Z on Yahoo Auctions Japan for a Buy It Now price of approximately US$32.17 (converted at JPY 157.96 per US dollar, based on the October 28, 2026 exchange rate).
My friend Mr. Sugiura, JK1SNS, sent it to me by EMS.
 
ECS LIVA Z
CPU x86 N4200
RAM SO-DIMM, upgradeable
Wired LAN 1Gbps ×2
Wi-Fi 2.4/5GHz 802.11ac
USB USB 3.x
Storage eMMC (58 GB built in) +M.2 SATA SSD (expandable)
Linux Ubuntu is listed as supported (see the specifications below).
Fan None

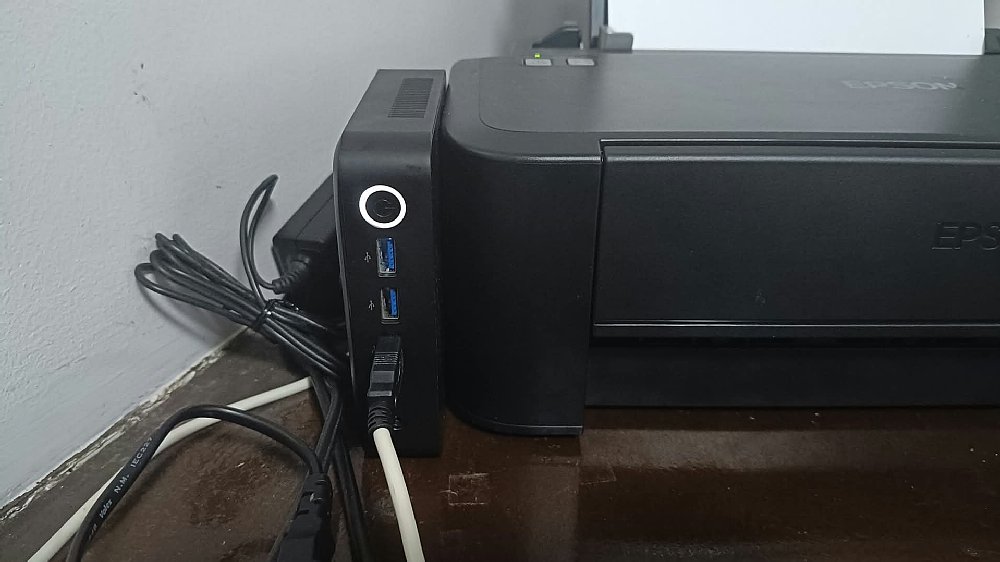
homeserver after installation

Even with 4 GB of RAM, it runs comfortably, unlike Windows on this machine.


Three Reasons for Installing Ubuntu Server

I installed Ubuntu Server to use the ECS LIVA Z as a home server for the family. It has three purposes: printer sharing, file sharing, and access to SatBox while away from home. This small PC connects the devices we use at home.

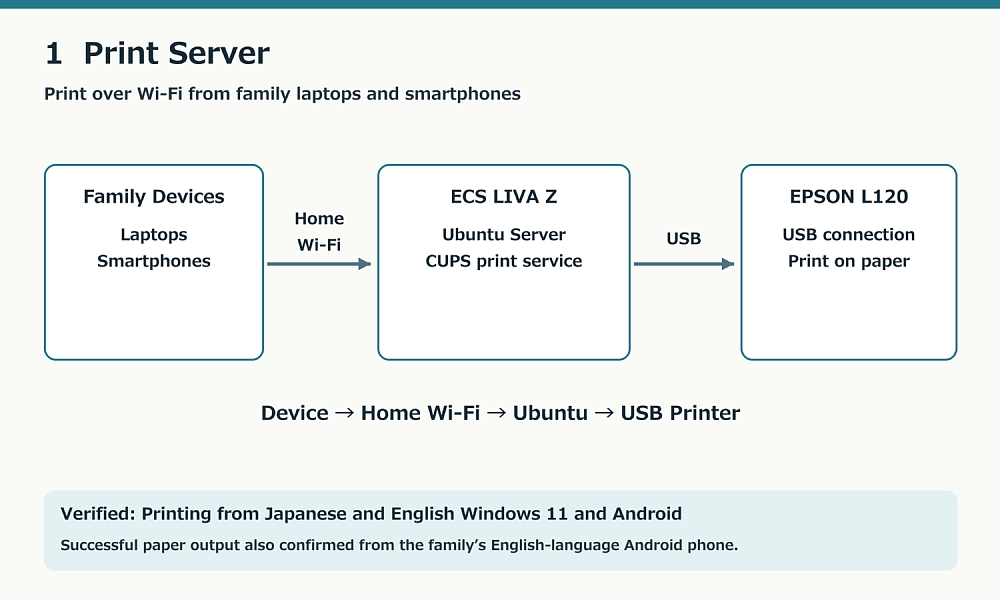
1) Print Server: Print to the EPSON L120 from Family Devices

The goal is to print to the EPSON L120 from laptops and smartphones connected to Wi-Fi. The printer connects to the Ubuntu server by USB, and CUPS receives print jobs from each device. There is no need to move the USB cable between devices each time someone prints.

Print from family laptops and smartphones over home Wi-Fi through Ubuntu CUPS to the USB-connected EPSON L120.
Figure 1. Print server accessed over home Wi-Fi

Actual paper output has been confirmed from both Japanese- and English-language Windows 11 PCs and Android smartphones.

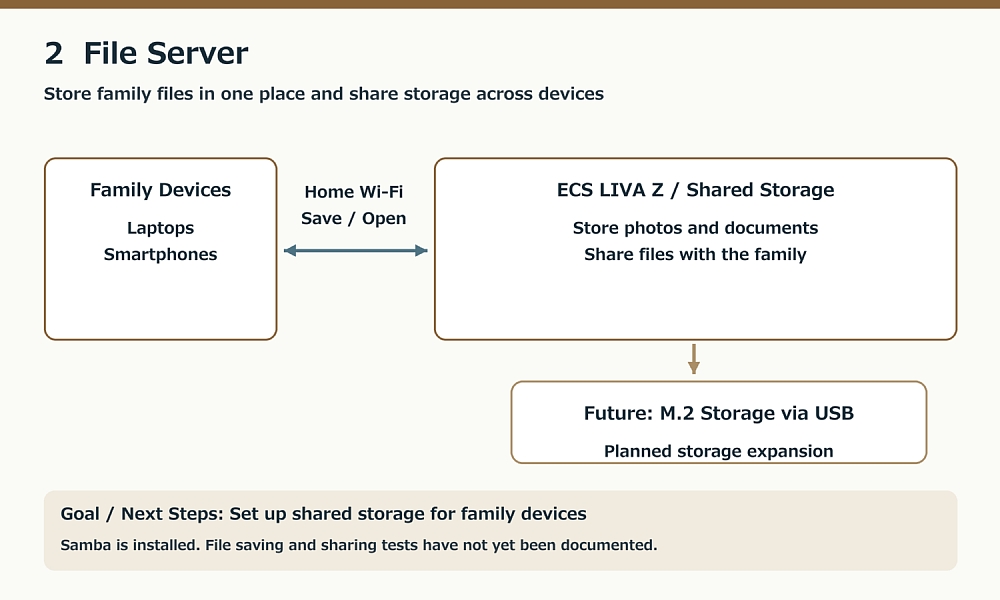
2) File Server: Shared Family Storage

The goal is to let laptops and smartphones save photos, documents, and other files to common family storage. Files currently scattered across devices can be collected on the server and saved or opened from whichever device needs them.

I plan to add M.2 storage connected by USB to increase the capacity available for shared files.

Shared family file storage with planned expansion using USB-connected M.2 storage.
Figure 2. File sharing and planned M.2 storage expansion

The work recorded in this article covers Samba installation. Successful file saving and sharing from client devices have not yet been documented. This diagram shows the intended use and future expansion plan.

3) Tailscale VPN: Access SatBox Away from Home

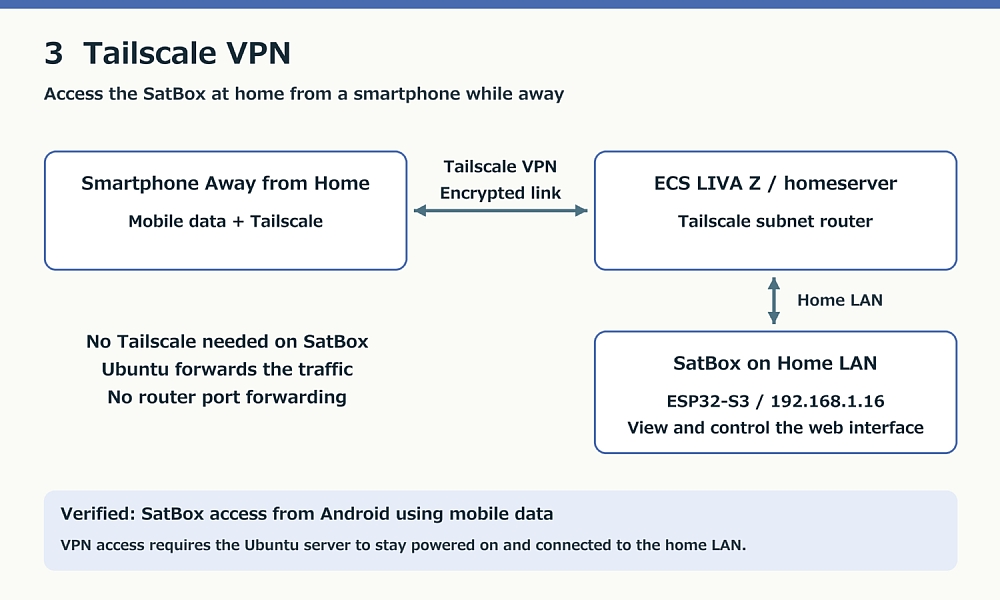
The goal is to open and operate the SatBox web interface on the home LAN from a smartphone while away. Tailscale connects the smartphone to Ubuntu, which forwards traffic to SatBox on the home LAN.

Remote smartphone access through Tailscale and Ubuntu to SatBox on the home LAN.
Figure 3. Remote access to SatBox through Tailscale VPN

Tailscale does not need to be installed on SatBox itself, and no router port forwarding was configured. Access to SatBox was confirmed with the phone's Wi-Fi turned off and mobile data enabled.

On October 28, 2026, I installed Ubuntu Server on the compact ECS LIVA Z, then configured SSH access from Windows, public-key authentication, remote SatBox access through a VPN, and network sharing of a USB printer.

The result was successful access to the SatBox web interface from an Android phone outside the home network, along with actual paper output from the EPSON L120 using Japanese- and English-language Windows 11 PCs and Android smartphones.

IP addresses, usernames, and OS and driver versions describe this installation at the time of the work. Substitute the actual values when using another environment. Passwords, SSH private keys, and Wi-Fi credentials are not included.

1. Installing Ubuntu Server

Ubuntu Server was installed on an ECS LIVA Z previously running Windows. The following is a record of that day's work, based on screen photographs and reported operations. Unconfirmed choices and unresolved issues are identified separately.

1. Hardware and Scope

Computer ECS LIVA Z (Intel Celeron N4200 / 4 GB RAM)
Installed OS Ubuntu Server 24.04.5 LTS (x86_64, Linux 6.8 series)
Internal storage Approximately 57.6 GB (installation target)
Installation media USB flash drive (ELECOM, approximately 115.6 GB on screen)
Setup interface BIOS screens and the Ubuntu Server text installer
After installation User: ji1fgx; hostname: homeserver; OpenSSH installed

2. BIOS Boot Settings

1) Select USB Boot in the BIOS

On the Boot screen of Aptio Setup Utility, Boot Option #1 was set to USB Flash. Boot mode was UEFI, and the operating system selection was Linux. The settings were saved and the computer restarted.

The USB flash drive had already been prepared with the Ubuntu Server installer.

At this stage, setting AC power recovery to Power On did not make the computer start automatically, so installation took priority. This was later resolved by disabling EuP Function. See Final BIOS Settings for details.

2) Start the Ubuntu Installer

The boot menu showed Try or Install Ubuntu Server, Ubuntu Server with the HWE kernel, and other choices. The standard Try or Install Ubuntu Server option was used. A cloud-init waiting message appeared during startup, followed shortly by the setup screen.

3. Installer Screens

3) Language

English was selected because Japanese was not offered.

4) Keyboard Configuration

A Japanese keyboard was used, so Japanese is the appropriate Layout. Identify keyboard is an optional helper that detects the layout from pressed keys. The final saved keyboard layout could not be confirmed from the photographs.

⑤ Choose the type of installation

The standard Ubuntu Server option was selected. Ubuntu Server (minimized) was not selected, and Search for third-party drivers was left unchecked.

⑥ Network configuration

Network configuration was completed. After installation, the wireless interface wlp2s0 was confirmed to have received 192.168.1.86.

⑦ Ubuntu archive mirror configuration

The mirror address was http://ph.archive.ubuntu.com/ubuntu/. The message This mirror location passed tests appeared. After the package list was retrieved, Done was selected to continue.

8) Storage Configuration

Use an entire disk was selected for the approximately 57.617 GB internal drive. LVM was unchecked, and disk encryption was not used.

Filesystem summary: /boot/efi approximately 1.049 GB (FAT32), and / approximately 56.565 GB (ext4).

The approximately 115.6 GB ELECOM USB drive was the installation source, not the target.

This configuration erases the existing Windows partitions. Writing begins after the disk selection is confirmed.

9) Profile Configuration

The login username was ji1fgx and the server name was homeserver. A display name was entered under Your name, and the password was entered twice. The password is not recorded here.

⑩ Upgrade to Ubuntu Pro

Skip for now was selected. Ubuntu Pro can be enabled later.

⑪ SSH configuration

Install OpenSSH server was checked. Allow password authentication over SSH remained enabled. No SSH public key was imported; key authentication would be configured later.

⑫ Featured Server Snaps

No additional featured snaps, such as microk8s, nextcloud, or Docker-related packages, were selected.

4. Installation and First Boot

13) Run the Installation

Progress messages such as Install Kernel were displayed. The logs recorded GRUB installation, OpenSSH Server installation, and security updates. Reboot Now appeared on the final screen.

14) Read Error During Restart

After the USB drive was removed during restart, SQUASHFS error: Failed to read block ... -5 briefly appeared repeatedly. The installer's live environment was likely still trying to read data from the USB drive. Ubuntu ultimately started successfully from the internal disk.

15) Log In to Ubuntu

At the Ubuntu 24.04.5 LTS homeserver login: prompt, logging in as ji1fgx with the password succeeded. On first boot, cloud-init displayed SSH host-key fingerprints and related information. This does not mean that a user SSH private key had been created.

5. Checks Immediately After Installation

Prompt ji1fgx@homeserver:~$
OS Ubuntu 24.04.5 LTS
Kernel 6.8.0-147-generic (at first login)
IP address 192.168.1.86(wlp2s0 / Wi-Fi)
Root filesystem Approximately 55.38 GB, 11.5% used
Memory usage 6%
CPU temperature 54–56°C (at the initial check)
SSH OpenSSH Server installed; successful connection from Tera Term

2. SSH Access, Updates, and Time Settings with Tera Term

Immediately after installation, SSH password authentication was used to update packages and configure the time. The switch to public-key authentication is described in the next chapter.

1. Starting Environment

OS Ubuntu Server 24.04.5 LTS(x86_64)
Kernel 6.8.0-147-generic (at login)
Hostname homeserver
Username ji1fgx
SSH client Tera Term(Windows)
Destination IP 192.168.1.86 (Wi-Fi: wlp2s0; address at the time)
Authentication User password (public-key authentication not yet configured)

2. Connect by SSH from Tera Term

In Tera Term, 192.168.1.86 was selected as the destination with username ji1fgx and password authentication. Login succeeded, and the prompt ji1fgx@homeserver:~$ appeared.

SSH host keys were generated during Ubuntu installation. These identify the server and are separate from the private key used by Tera Term for user authentication.

3. Update the Package Lists

sudo apt update

Result: All four Ubuntu repositories were reached successfully. Reading package lists... Done and 27 packages can be upgraded. were displayed.

4. Upgrade Installed Packages

sudo apt upgrade -y

Result: The update completed and returned to the command prompt. needrestart restarted cron, ssh, and related systemd services.

The kernel and CPU microcode were reported as current. Some service restarts were deferred, and existing login sessions were reported to be using old binaries. A reboot was expected to clear these notices.

The screen also offered an upgrade to Ubuntu 26.04.1 LTS, but do-release-upgrade was not run.

5. Set and Check the Time Zone

sudo timedatectl set-timezone Asia/Manila

timedatectl

Check results (around 13:43 on October 28, 2026):

Local time: Wed 2026-10-28 13:43:33 PST

Universal time: Wed 2026-10-28 05:43:33 UTC

RTC time: Wed 2026-10-28 05:43:33

Time zone: Asia/Manila (PST, +0800)

System clock synchronized: yes

NTP service: active

RTC in local TZ: no

The time zone was set to Philippine time (UTC+8). NTP synchronization was active, and the RTC was correctly treated as UTC.

6. Status at the End of This Stage

SSH login, package updates, and time-zone setup were complete. At this point in the record, rebooting and reconnecting had not yet been confirmed.

3. Switching to SSH Public-Key Authentication

1. Purpose and Environment

Switch Tera Term SSH access from password authentication to ED25519 public-key authentication and prevent password-only SSH login.

Computer ECS LIVA Z(Celeron N4200 / RAM 4GB)
OS Ubuntu Server 24.04.5 LTS
Hostname homeserver
User ji1fgx
SSH destination (during setup) 192.168.1.86 : 22(Wi-Fi)
Client Windows / Tera Term

2. Check the SSH Service

Log in from Tera Term and run the following command.

sudo systemctl status ssh

Result: Active: active (running), listening on port 22 on 0.0.0.0 and ::. Password-login history was also visible. Although ssh.service was shown as disabled, it was started by ssh.socket and was operating normally.

3. Register the Public Key

mkdir -p ~/.ssh
chmod 700 ~/.ssh

In Tera Term, open Setup → SSH key generator, select ED25519 (256 bits), and set a passphrase. Save the public key (.pub) and private key on Windows. Do not transfer the private key to the server.

On Ubuntu, use vi to place the single public-key line beginning with ssh-ed25519 in ~/.ssh/authorized_keys.

vi ~/.ssh/authorized_keys
chmod 700 ~/.ssh
chmod 600 ~/.ssh/authorized_keys
cat ~/.ssh/authorized_keys

A separate Tera Term session successfully logged in as ji1fgx using the private key and passphrase. The original session remained open.

4. Disable Password Authentication

Check the configuration precedence.

sudo grep -RniE '^\s*(PasswordAuthentication|KbdInteractiveAuthentication|PubkeyAuthentication|AuthenticationMethods)\b' /etc/ssh/sshd_config /etc/ssh/sshd_config.d/

Before the change, /etc/ssh/sshd_config contained KbdInteractiveAuthentication no, while /etc/ssh/sshd_config.d/50-cloud-init.conf contained PasswordAuthentication yes.

Create a new configuration file that is read earlier.

sudo vi /etc/ssh/sshd_config.d/01-key-only.conf
PubkeyAuthentication yes
PasswordAuthentication no
KbdInteractiveAuthentication no

Check syntax and effective settings, then reload SSH.

sudo sshd -t
sudo sshd -T | grep -Ei '^(pubkeyauthentication|passwordauthentication|kbdinteractiveauthentication) '
sudo systemctl reload ssh

sshd -t produced no output, indicating no syntax errors. sshd -T displayed the following.

pubkeyauthentication yes
passwordauthentication no
kbdinteractiveauthentication no

5. Connection Tests and Results

Private key + passphrase Login successful
Password only Login denied (as intended)
SSH configuration syntax Valid
Final state Public-key authentication only

6. Operational Notes

Keep the private key and passphrase safe and maintain a backup of the key. Disabling SSH password authentication does not remove the password used for local login or sudo. Losing the key can prevent SSH access.

4. Remote SatBox Access with Tailscale VPN

1. Configuration and Connection Results

Android smartphone outside the home (mobile data)

Tailscale VPN

homeserver (Ubuntu Server / home LAN: 192.168.1.86)

SatBox (ESP32-S3 / static IP: 192.168.1.16)

Figure 1. The remote-access path configured in this installation

2. Prepare Ubuntu

Log in to homeserver from Tera Term using SSH public-key authentication. Ubuntu is connected to the home LAN over Wi-Fi. The wired LAN interfaces were not used.

After installing Tailscale, device authentication was started with the following command.

sudo tailscale up

The displayed authentication URL was opened in a browser, and the existing Tailscale account was used to sign in. homeserver appeared as Connected in the Machines list of the administration console.

3. Enable IP Forwarding

On Ubuntu, /etc/sysctl.d/99-tailscale.conf was edited to enable IPv4 and IPv6 forwarding.

net.ipv4.ip_forward = 1

net.ipv6.conf.all.forwarding = 1

sudo sysctl --system

The output showed net.ipv4.ip_forward = 1 and net.ipv6.conf.all.forwarding = 1, confirming that the settings had taken effect.

4. Advertise a Route to SatBox

Run the following command on Ubuntu. The /32 prefix advertises only the single SatBox IP address rather than the entire LAN.

sudo tailscale set --advertise-routes=192.168.1.16/32

In the Tailscale admin console, Machines → homeserver → Subnets showed 192.168.1.16/32 as Awaiting Approval. Edit route settings was opened, the route was checked, and Save was clicked to approve it.

5. Give SatBox a Static IP Address

SatBox was changed from DHCP to the static address 192.168.1.16 so the advertised Tailscale route would still point to the same device after a restart. The address must not conflict with the home router's DHCP pool.

6. Test from a Smartphone Outside the Home Network

Turn off the smartphone's Wi-Fi and use mobile data.

Connect Tailscale on the smartphone.

Open http://192.168.1.16/ in the browser.

The SatBox web interface appeared, confirming successful access from outside the home network.

Result: SatBox could be reached through the VPN without opening ports on the router.

7. Additional Notes and Ongoing Management

  • Tailscale is not installed on SatBox itself. homeserver forwards traffic as a subnet router.
  • Adding the name satbox to Ubuntu's hosts file does not automatically make it resolvable on smartphones. Configure DNS later if needed.
  • At this stage, homeserver's LAN IP was assigned by DHCP. Tailscale connectivity does not necessarily require a static LAN address.
  • VPN forwarding to SatBox is available only while Ubuntu remains powered on and connected to Wi-Fi.

5. Setting Up the EPSON L120 Print Server

1. Completed Configuration

Server ECS LIVA Z / Ubuntu Server 24.04.5 LTS
Network Wi-Fi wlp2s0, static IP 192.168.1.86/24
Router / DNS 192.168.1.1
Printer EPSON L120、USB ID 04b8:005e
Print service CUPS(IPP / TCP 631)
Name shown in Windows EPSON_L120 @ homeserver
IPP URL http://192.168.1.86:631/printers/EPSON_L120
Paper size A4 by default; Letter also supported

2. Install CUPS, Samba, and EPSON Packages

sudo apt install cups cups-client printer-driver-escpr usbutils samba
sudo systemctl enable --now cups

The standard printer-driver-escpr package did not include an L120 model definition, so the official EPSON Linux driver was added.

3. Obtain and Transfer the Official EPSON Driver

In the EPSON Download Center, select L120 Series and Linux Deb(x64). The Intel N4200 requires the x64 package rather than an ARM package.

Downloaded file: epson-inkjet-printer-201310w_1.0.2-1_amd64.deb (version 1.0.2-1).

After connecting by SSH in Tera Term on Windows, use File → SSH SCP... to send the file to /home/ji1fgx/. No FTP server is needed.

ls -lh ~/epson*.deb
sudo apt install ./epson-inkjet-printer-201310w_1.0.2-1_amd64.deb

APT's unsandboxed as root message was a notice; installation itself succeeded.

4. Check the USB Device and Driver

lpinfo -m | grep -i L120

Result: Epson L120 Series - epson-inkjet-printer 1.0.2-1

lsusb

Result: 04b8:005e Seiko Epson Corp. EPSON L120 Series

sudo lpinfo -v

Result: usb://EPSON/L120%20Series?serial=58394C563335323675

lpinfo -v returned Forbidden for the ordinary user but worked with sudo.

sudo usermod -aG lpadmin ji1fgx

5. Register the Printer in CUPS and Test Locally

sudo lpadmin -p EPSON_L120 -E -v 'usb://EPSON/L120%20Series?serial=58394C563335323675' -m 'lsb/usr/epson-inkjet-printer-201310w/Epson/Epson-L120_Series-epson-driver.ppd.gz'
sudo cupsaccept EPSON_L120
sudo lpadmin -p EPSON_L120 -o PageSize=A4
sudo lpadmin -d EPSON_L120
lpstat -t
echo "EPSON L120 Ubuntu Print Server Test" | lp -d EPSON_L120

Paper output succeeded. Printer drivers are deprecated is a warning about future CUPS versions; printing worked normally in this installation.

lpoptions -p EPSON_L120 -l | grep -i PageSize

Result: *A4, Letter, Legal, and other sizes. Select Letter for Short Bond Paper used for university submissions (approximately 216 × 279 mm).

6. Samba Setup and the Authentication Issue

The [EPSON_L120] Samba share was added to smb.conf. /var/spool/samba was created with permissions set to 1777.

sudo mkdir -p /var/spool/samba
sudo chmod 1777 /var/spool/samba
testparm -s
sudo systemctl enable --now smbd

Samba was active (running), but opening \\192.168.1.86 in Windows requested credentials. IPP was chosen instead of Samba so my daughters could print without a password. Samba was retained for future file sharing.

7. Share CUPS Printers over the Network

sudo cupsctl --share-printers
sudo lpadmin -p EPSON_L120 -o printer-is-shared=true
sudo cupsctl | grep share

Result: _share_printers=1

sudo ss -lntp | grep ':631'

Result: CUPS was listening on 0.0.0.0:631 and [::]:631.

Opening http://192.168.1.86:631/printers/EPSON_L120 in a Windows browser showed that the printer was shared, idle, and accepting jobs.

8. Assign a Static IP to Ubuntu Wi-Fi

The existing /etc/netplan/50-cloud-init.yaml file was backed up and edited with vi. Wi-Fi SSID and authentication settings were retained. Settings were changed to dhcp4: false, addresses: [192.168.1.86/24], a default route via 192.168.1.1, and DNS 192.168.1.1.

The Wi-Fi password is not included in this record.

sudo netplan generate
sudo netplan try --timeout 120

Configuration accepted. was confirmed.

ip -4 addr show wlp2s0

Result: inet 192.168.1.86/24, valid_lft forever.

Router DHCP reservation or exclusion has not yet been configured. A conflict is possible if this address is in the DHCP pool, so a reservation is recommended once access to the router is available.

9. Server Names and Printing from Windows 11

Ubuntu's hostname is homeserver. Samba was configured with netbios name = HOME-SERVER, but Windows could not resolve \\HOME-SERVER.

However, EPSON_L120 @ homeserver was automatically discovered in Windows 11 under Settings → Bluetooth & devices → Printers & scanners.

After Add device was selected, the status briefly showed a connection attempt and then became Ready.

The Windows test page printed successfully. A Microsoft Word document also printed normally.

Windows uses IPP for printing. No Samba username or password is required.

10. Operating Notes

Add EPSON_L120 @ homeserver on my daughters' PCs as well. If it is not found, add it manually using the IPP URL.

For Short Bond Paper in Word, select Letter in both Page Setup and Print Settings. Check the required dimensions separately for documents that specify exactly 216 × 278 mm.

An existing EPSON L120 Series (Offline) entry may be an old registration. Avoid selecting it by mistake.

Restrict CUPS TCP port 631 to the home LAN. Do not expose it to the internet through the router.

The Netplan configuration originated from cloud-init. Check that these settings are preserved during future rebuilding or network reinitialization.

11. Adding the Printer on My Daughter's Windows 11 PC

My daughter's Windows 11 PC also discovered EPSON_L120 @ homeserver automatically after a short search. Entering the IPP URL manually was unnecessary.

On English-language Windows 11, open Settings → Bluetooth & devices → Printers & scanners.

Turn off Let Windows manage my default printer to prevent automatic changes to the default printer.

Check that EPSON_L120 @ homeserver is marked Default. It was already the default, so no additional action was necessary.

12. Printing from an Android Smartphone (Tested on Hardware)

Search for printing in Android Settings and open Default print service. Device connection settings had a different name on this phone and did not contain a printing entry, so using Settings search was the reliable approach.

Enabling Default print service automatically displayed EPSON_L120 @ homeserver as an available device, with IP address 192.168.1.86. Manual registration was unnecessary.

Connect the smartphone to the same home Wi-Fi and open the photo or document to print.

On this Android phone, Print was selected from the Share icon rather than the app's menu.

EPSON_L120 @ homeserver was selected, and actual paper output succeeded.

Result: Ubuntu Server 24.04.5 LTS with CUPS and a USB-connected EPSON L120 successfully provided network printing for both Windows 11 and Android.

The way to invoke printing varies by app. If Print is not offered in the Share menu, use the app's own print feature or open the file in another viewing app.

13. Printing Setup on an English-Language Android Phone

The family's English-language Android phone automatically discovered the Ubuntu CUPS printer EPSON_L120 @ homeserver. The following is the sequence confirmed on that phone.

1. Open Settings and search for Print.

2. Open More connection settings, then tap Printing.

3. Under Print services, confirm that Default print service is On.

4. Tap the words Default print service, rather than the switch, to open the available printer list.

5. Confirm that EPSON_L120 @ homeserver appears. It was discovered automatically, so no IP address had to be registered manually.

How to Print

Connect the phone to the same home Wi-Fi as Ubuntu, open a photo or PDF, and choose Share → Print. Select EPSON_L120 @ homeserver and print. Some apps offer printing in their own menus instead of Share.

Confirmed Results and Notes

The family's English-language Android phone successfully discovered the printer and printed on paper. Successful printing has also been confirmed on Japanese-language Android and both Japanese- and English-language Windows 11.

If the printer is not detected, check that the phone is on the same Wi-Fi, wait briefly, and search again. If necessary, use a print service that supports manually adding the IPP URL http://192.168.1.86:631/printers/EPSON_L120.

6. File Server: Shared Family Storage

Separate from printer sharing, the aim is to let family laptops and smartphones save files to common storage.

Samba Installation and Current Status

Samba was installed with the packages in the previous chapter, and smbd was confirmed running. However, Samba printer settings and folder sharing for photos and documents are separate configurations. This record does not yet document the family shared-folder setup or successful file saving from client devices.

Remaining File-Sharing Tasks

  • Create a shared family folder for photos and documents.
  • Decide which family users can access it and their read/write permissions.
  • Connect from laptops and smartphones and test saving and opening files.

Future Storage Expansion

The plan is to add M.2 storage connected by USB to increase shared-file capacity.

Final Status and Remaining Tasks

Ubuntu ServerBoots from the internal drive; SSH access, package updates, and the Asia/Manila time zone are configured.
SSH authenticationLogin succeeded with an ED25519 private key and passphrase. SSH password authentication is disabled.
Remote SatBox accesshomeserver forwards Tailscale traffic, allowing Android access over mobile data. Tailscale is not installed on SatBox itself.
Ubuntu LAN addressInitially DHCP; changed to static 192.168.1.86/24 during print-server setup.
PrintingActual paper output through CUPS IPP has been confirmed from Japanese- and English-language Windows 11 PCs and Android smartphones.
SambaInstalled but not used for this printer share. Resolving HOME-SERVER from Windows has not succeeded.
Preventing IP conflictsRouter DHCP reservation or exclusion is still pending. The static server address must be kept from conflicting with the DHCP pool.
Recovery After a Power FailureResolved. Restore AC Power Loss = Power On and EuP Function = Disabled enabled automatic startup when AC power is applied or restored. Confirmed with BIOS version 19.08.19. VPN forwarding and printer sharing require homeserver to remain powered on and connected to the LAN.

Final BIOS Settings and the Automatic Power-On Fix

Setting Restore AC Power Loss to Power On alone did not enable automatic startup when AC power was applied or restored. After additionally changing EuP Function to Disabled, automatic startup worked and the power-recovery issue was resolved.

BIOS ItemSetting / Confirmed Result
Restore AC Power LossPower On
EuP FunctionDisabled — This change enabled automatic startup when AC power was applied or restored.
BIOS Version19.08.19 — Worked correctly with this version.

These are the final settings that enabled automatic startup on this ECS LIVA Z.

October 22, 2026 November 2, 2026