| English | Japanese |
|
Yesterdays access |
|
| Page Top | [Lily Diary.】 A diary of life in Mindanao. |
| 26/11/07 | SatBox_Ver0.1.1c-beta IC-9700 Test Version |
| 26/11/07 | SatBox User Guide |
| 26/11/03 | An FT-847 for SatBox Development |
| 26/11/02 | Buying a ZT219 Digital Multimeter |
| 26/10/28 | Building a home server using Linux |
| 26/10/27 | Repeater Controller Features and Settings |
| 26/10/27 | Repeater Controller Board and Firmware |
| 26/10/26 | JTDX Auto Run Ver0.7.7 |
| 26/10/26 | WSJT-X Auto Run Ver0.1.6 |
| 26/10/22 | Memories of UNIX and Networking from My Yonezawa Ham Shack |
| 26/10/20 | Acquiring a YAESU FT-2600M for a Repeater |
| 26/10/19 | Rotator Relay Interface for Sale |
| 26/10/18 | Kenpro Rotator Interface KiCAD DATA |
| 26/10/17 | JOTA in Indonesia: Jamboree on the Air |
| 26/10/17 | You Can Now Leave Comments |
| 26/10/11 | Installing Arduino IDE |
| 26/10/09 | DXCC200 Sticker Arrives from ARRL |
| 26/10/08 | SatBox Cloud Released |
| 26/10/06 | Bought an ECS LIVA Z Mini PC on Yahoo Auctions |
| 26/10/05 | QSO with C5R in The Gambia |
| 26/10/04 | Installing Raspberry Pi OS |
| 26/10/02 | Repeater Controller Features and Settings |
| 26/10/01 | Repeater Controller Board and Firmware |
| 26/09/30 | Ordering PCBs and Assembly from JLCPCB |
| 26/09/24 | UNITRUST Electronics Parts Shop |
| 26/09/22 | Kenpro Rotator Interface |
| 26/09/18 | SatBox KiCad PCB and firmware |
| 26/09/14 | designed a circuit board for SatBox |
| 26/09/12 | Solar Power System Plan |
| 26/09/09 | Satellite SatBox Part 4 |
| 26/09/04 | My grandson Zion |
| 26/08/29 | Ham Fair 2026 to be held |
| 26/08/25 | QSO with RI1FJL from Franz Josef Land |
| 26/08/23 | Satellite QSO via RS-44 |
| 26/08/22 | Currently, Satellite VUCC46 |
| 26/08/16 | Satellite SatBox Development in Progress - Part 3 |
| 26/08/05 | IC-820H Receiver Sensitivity Test |
| 26/08/02 | Satellite SatBox Development in Progress - Part 2 |
| 26/07/16 | Delivery of the 3D printed panels |
| 26/07/09 | Development of SatBox for satellites |
| 26/07/05 | Weather Monitor Indoor Unit |
| 26/06/30 | Creating data for 3D printers using FreeCAD |
| 26/06/16 | Installing an AS5600 magnetic encoder on a KR-500. |
| 26/06/05 | Grandson Zion's CQ |
| 26/06/04 | Replacing the potentiometer on the KR-500 elevation rotator |
| 26/06/03 | Making a Repeater Controller Pert4 |
| 26/06/01 | Weather Monitor software |
| 26/05/31 | Weather Monitor |
| 26/05/21 | JTDX Auto Run BUGFIX |
| 26/05/17 | Repair of satellite antenna system |
| 26/05/13 | Repair of Alinco DR130 |
| 26/05/07 | Making a Repeater Controller Pert3 |
| 26/05/03 | Indonesian satellite friend YC8RPK |
| 26/04/26 | DXCC200 achieved |
| 26/04/23 | Communication via ISS voice repeater |
| 26/04/20 | WSJT-X Auto Run Ver0.1.5 |
| 26/04/19 | Got an Alinco DR-130 |
| 26/04/15 | Clublog Charts |
| 26/04/10 | Regarding POC transceivers |
| 26/04/08 | Using KENWOOD AT-300 with YAESU radio |
| 26/03/17 | How to establish a radio club in the Philippines |
| 26/03/10 | KENWOOD AT-300 with YAESU radio |
| 26/02/27 | Philippine NTC Amateur Radio License Examination Question Bank |
| 26/02/20 | Package received from JK1SNS |
| 26/02/18 | Temporary License Renewal |
| 26/02/14 | Satellite Tracking Software SatTrack |
| 26/02/05 | Making a Repeater Controller Pert2 |
| 26/02/02 | CQ on satellite IO-86 |
| 26/01/27 | Shack & Repeater Controller |
| 26/01/16 | Making a Repeater Controller |
| 26/01/16 | Making aRotator Interface PCB |
| 26/01/10 | Satellite antenna installation |
| 26/01/08 | WSJT-X Remote Operation |
| 26/01/07 | JTDX Remote Operation |
| 26/01/04 | log_reciver_Ver2.6.6 |
| 26/01/04 | Tailscale VPN software for JTDX_Remote |
| Online Multiple Choice Reviewers to the Phil Amateur Radio Examination by 4F3EW A joint project by JI1FGX/DU9 and DV9JRD |
| Installing Arduino IDE (October 11, 2026) | ||||
|---|---|---|---|---|
1. Install Arduino IDEThe Repeater Controller, SatBox, Temperature, Humidity, and Atmospheric Pressure Monitor, and other projects use the ESP32-S3. I use Arduino IDE to develop and upload their programs. This guide explains how to install Arduino IDE on Windows 11 and set it up for the ESP32-S3. Arduino IDE is development software for editing programs, compiling them into a form a microcontroller can run, and uploading them to the board. It is available free of charge from the official Arduino website.
Installing Arduino IDE alone does not enable uploads to the ESP32-S3. Next, add the ESP32 board package provided by Espressif Systems. The Arduino IDE version and the ESP32 board package version are separate. For more detailed instructions, see the official Arduino installation guide. 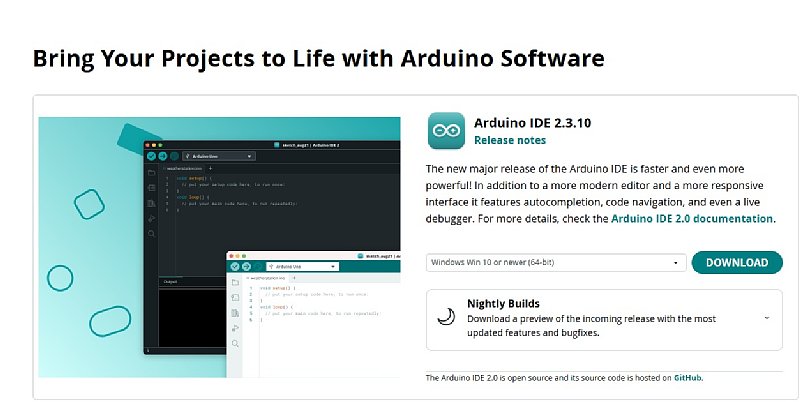 |
||||
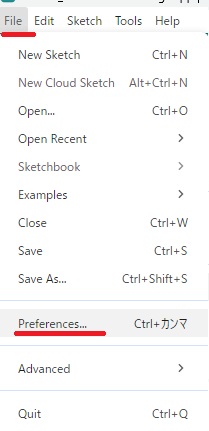
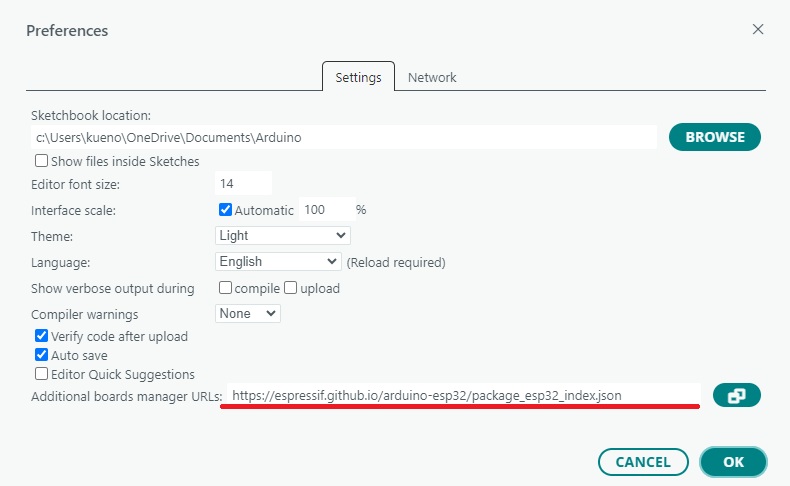
2. Add the ESP32 Boards Manager URLIn Arduino IDE, open “File” → “Preferences,” enter the following URL in “Additional boards manager URLs,” and click “OK.” If another URL is already listed, keep it and use the list-editing button on the right to add the ESP32 URL. This is the stable-release URL listed in the official Espressif installation instructions.
|
||||
3. Install the ESP32 Board PackageOpen “Boards Manager” on the left and enter For this guide, select board package version 3.3.12. If the program download page specifies a different version, use that version instead. Wait for the download and installation to finish. 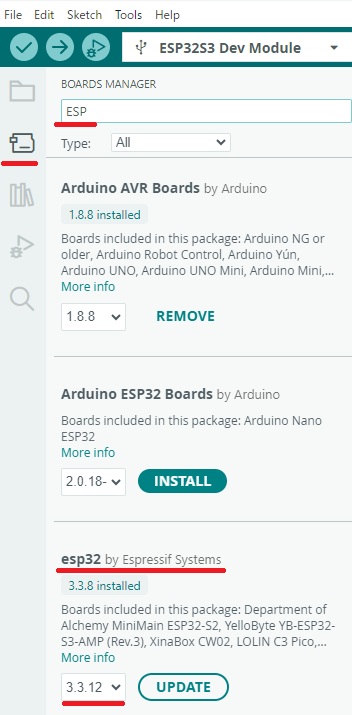 |
||||
4. Select the ESP32-S3 BoardSelect “Tools”→“Board”→“esp32”→ESP32S3 Dev Module. ESP32, ESP32-S2, and ESP32-S3 are different models, so select the board that matches your ESP32-S3. 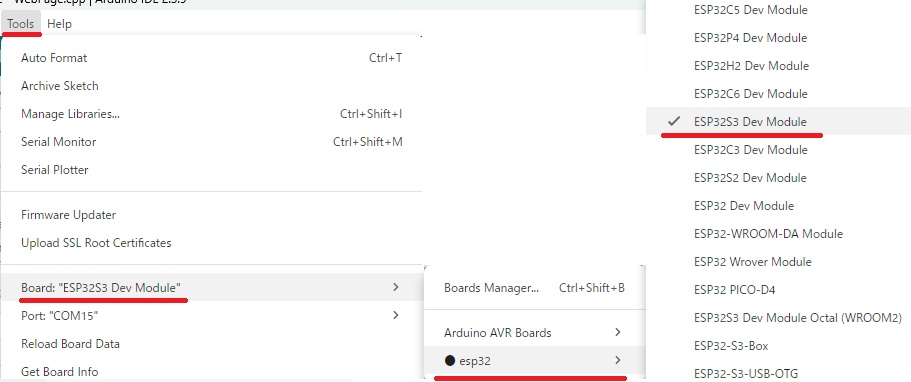 |
||||
5. Check the USB Connection and COM PortConnect the ESP32-S3 to your computer using a USB cable that supports data transfer. Under “Tools” → “Port,” select the COM port for the connected ESP32-S3. If you are unsure which COM port to use, look for the port that disappears when you unplug the USB cable and reappears when you reconnect it. Charge-only USB cables cannot carry data. If no port appears, check the cable and USB connection. Boards with a USB-to-serial converter may require a driver for that chip. 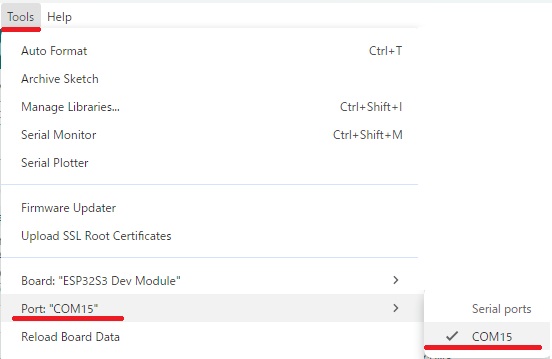 |
||||
6. Set the Partition Scheme for SatBoxSatBox has a large program, so under “Tools” → “Partition Scheme,” select Huge APP (3MB No OTA/1MB SPIFFS). This setting provides more space for storing the program. Repeater Controller and Temperature, Humidity, and Atmospheric Pressure Monitor can use the default Partition Scheme unless their download pages specify otherwise. Set Flash Size, PSRAM, and other options according to your board and the program instructions. 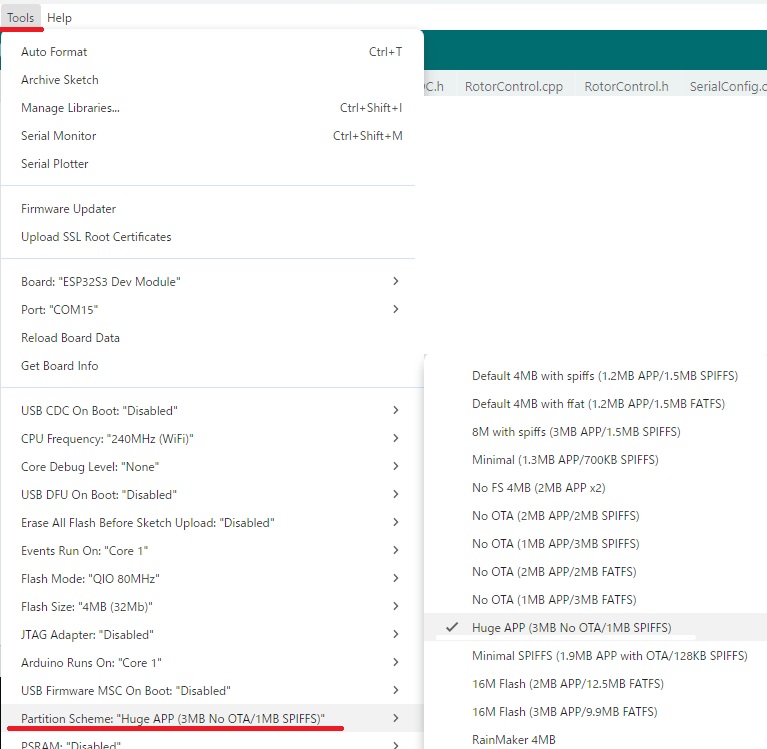 |
||||
7. Open and Upload the ProgramIf the program is distributed as a ZIP file, extract it first. In Arduino IDE, open the Install the libraries required by the program according to the instructions on its download page. Installing the ESP32 board package does not automatically install all the libraries each project needs. Click the check mark (“Verify”) at the top left to compile the program. Once it compiles without errors, click the right-pointing arrow (“Upload”). Check the selected board and COM port again before uploading. To view startup messages in the Serial Monitor, set its baud rate to the value specified in the program. For more details, see the official Arduino upload instructions. |
||||
| October 9, 2026 October 17, 2026 | ||||