| English | Japanese |
|
Yesterdays access |
|
| Page Top | [Lily Diary.】 A diary of life in Mindanao. |
| 26/11/07 | SatBox_Ver0.1.1c-beta IC-9700 Test Version |
| 26/11/07 | SatBox User Guide |
| 26/11/03 | An FT-847 for SatBox Development |
| 26/11/02 | Buying a ZT219 Digital Multimeter |
| 26/10/28 | Building a home server using Linux |
| 26/10/27 | Repeater Controller Features and Settings |
| 26/10/27 | Repeater Controller Board and Firmware |
| 26/10/26 | JTDX Auto Run Ver0.7.7 |
| 26/10/26 | WSJT-X Auto Run Ver0.1.6 |
| 26/10/22 | Memories of UNIX and Networking from My Yonezawa Ham Shack |
| 26/10/20 | Acquiring a YAESU FT-2600M for a Repeater |
| 26/10/19 | Rotator Relay Interface for Sale |
| 26/10/18 | Kenpro Rotator Interface KiCAD DATA |
| 26/10/17 | JOTA in Indonesia: Jamboree on the Air |
| 26/10/17 | You Can Now Leave Comments |
| 26/10/11 | Installing Arduino IDE |
| 26/10/09 | DXCC200 Sticker Arrives from ARRL |
| 26/10/08 | SatBox Cloud Released |
| 26/10/06 | Bought an ECS LIVA Z Mini PC on Yahoo Auctions |
| 26/10/05 | QSO with C5R in The Gambia |
| 26/10/04 | Installing Raspberry Pi OS |
| 26/10/02 | Repeater Controller Features and Settings |
| 26/10/01 | Repeater Controller Board and Firmware |
| 26/09/30 | Ordering PCBs and Assembly from JLCPCB |
| 26/09/24 | UNITRUST Electronics Parts Shop |
| 26/09/22 | Kenpro Rotator Interface |
| 26/09/18 | SatBox KiCad PCB and firmware |
| 26/09/14 | designed a circuit board for SatBox |
| 26/09/12 | Solar Power System Plan |
| 26/09/09 | Satellite SatBox Part 4 |
| 26/09/04 | My grandson Zion |
| 26/08/29 | Ham Fair 2026 to be held |
| 26/08/25 | QSO with RI1FJL from Franz Josef Land |
| 26/08/23 | Satellite QSO via RS-44 |
| 26/08/22 | Currently, Satellite VUCC46 |
| 26/08/16 | Satellite SatBox Development in Progress - Part 3 |
| 26/08/05 | IC-820H Receiver Sensitivity Test |
| 26/08/02 | Satellite SatBox Development in Progress - Part 2 |
| 26/07/16 | Delivery of the 3D printed panels |
| 26/07/09 | Development of SatBox for satellites |
| 26/07/05 | Weather Monitor Indoor Unit |
| 26/06/30 | Creating data for 3D printers using FreeCAD |
| 26/06/16 | Installing an AS5600 magnetic encoder on a KR-500. |
| 26/06/05 | Grandson Zion's CQ |
| 26/06/04 | Replacing the potentiometer on the KR-500 elevation rotator |
| 26/06/03 | Making a Repeater Controller Pert4 |
| 26/06/01 | Weather Monitor software |
| 26/05/31 | Weather Monitor |
| 26/05/21 | JTDX Auto Run BUGFIX |
| 26/05/17 | Repair of satellite antenna system |
| 26/05/13 | Repair of Alinco DR130 |
| 26/05/07 | Making a Repeater Controller Pert3 |
| 26/05/03 | Indonesian satellite friend YC8RPK |
| 26/04/26 | DXCC200 achieved |
| 26/04/23 | Communication via ISS voice repeater |
| 26/04/20 | WSJT-X Auto Run Ver0.1.5 |
| 26/04/19 | Got an Alinco DR-130 |
| 26/04/15 | Clublog Charts |
| 26/04/10 | Regarding POC transceivers |
| 26/04/08 | Using KENWOOD AT-300 with YAESU radio |
| 26/03/17 | How to establish a radio club in the Philippines |
| 26/03/10 | KENWOOD AT-300 with YAESU radio |
| 26/02/27 | Philippine NTC Amateur Radio License Examination Question Bank |
| 26/02/20 | Package received from JK1SNS |
| 26/02/18 | Temporary License Renewal |
| 26/02/14 | Satellite Tracking Software SatTrack |
| 26/02/05 | Making a Repeater Controller Pert2 |
| 26/02/02 | CQ on satellite IO-86 |
| 26/01/27 | Shack & Repeater Controller |
| 26/01/16 | Making a Repeater Controller |
| 26/01/16 | Making aRotator Interface PCB |
| 26/01/10 | Satellite antenna installation |
| 26/01/08 | WSJT-X Remote Operation |
| 26/01/07 | JTDX Remote Operation |
| 26/01/04 | log_reciver_Ver2.6.6 |
| 26/01/04 | Tailscale VPN software for JTDX_Remote |
| Online Multiple Choice Reviewers to the Phil Amateur Radio Examination by 4F3EW A joint project by JI1FGX/DU9 and DV9JRD |
| Installing Raspberry Pi OS (October 4, 2026) | ||
|---|---|---|
Preparing a small computer for VPN useI currently run the VPN software Tailscale on a laptop so that I can access my JTDX remote automation application and SatBox alerts from my smartphone while away from home. For details of the setup, see my earlier article on using Tailscale. Instead of leaving a laptop running all the time for the VPN, I considered using a small Raspberry Pi. The Raspberry Pi Zero 2 W I looked at was priced at more than 8,000 pesos (approximately US$138), while the Raspberry Pi 3 Model B was available for as little as 2,400 pesos (approximately US$40), so I decided to use the Pi 3 Model B. Eventually, I plan to add audio input and output and develop the system for remote satellite radio operation. This article records how to write Raspberry Pi OS to a microSD card using a Windows PC and prepare it for SSH operation without a connected monitor or keyboard. As of October 4, 2026, I have not yet purchased the Raspberry Pi itself, so the work completed so far is limited to preparing the microSD card. The first-boot instructions and subsequent steps are a guide for use after purchasing the hardware. Installing Tailscale and configuring the VPN are separate tasks. What you need
The microSD card acts as the Raspberry Pi's system disk. Writing the OS will erase all data on the card, so back up any files you need first.   |
||
1. Download Raspberry Pi ImagerRaspberry Pi OS is a Linux-based operating system. Here, we use the official image-writing tool, Raspberry Pi Imager. On your Windows PC, open the official Raspberry Pi software page and download Imager for Windows. Imager downloads the OS later during the writing process, so there is no need to download a separate OS image at this stage. 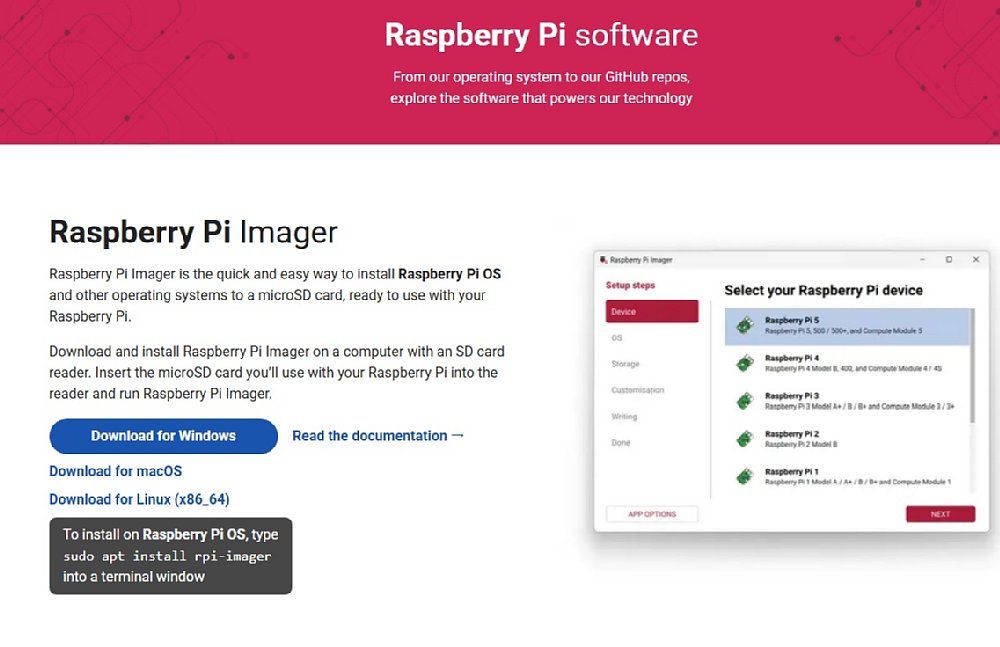 |
||
2. Install ImagerOpen the downloaded executable and follow the instructions to install Imager on your Windows PC. The file I used was named 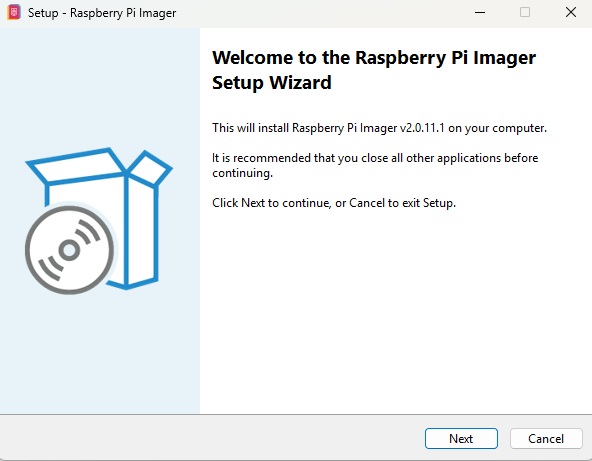  |
||
3. Select your Raspberry Pi modelOn the Device screen, select Raspberry Pi 3. Selecting the hardware first makes it easier to choose a compatible OS. If you are using another model, select that model instead. 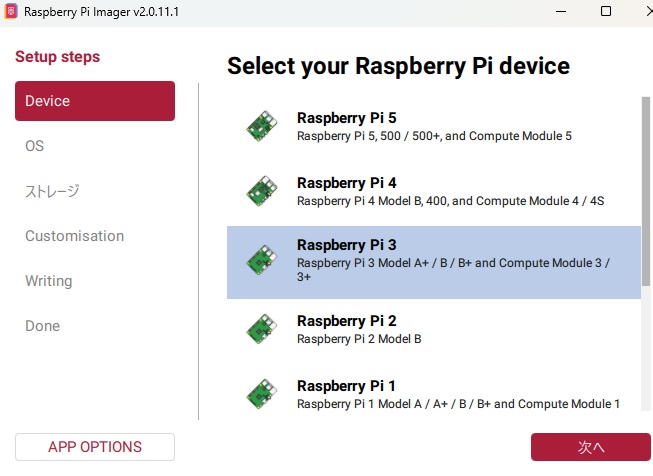 |
||
4. Select the OSIf you want a desktop interface, select the standard Raspberry Pi OS. Raspberry Pi OS Full includes the desktop and additional recommended applications. Since this setup is intended for VPN use and will be controlled with commands from a Windows PC, open Raspberry Pi OS (other) and choose Lite. 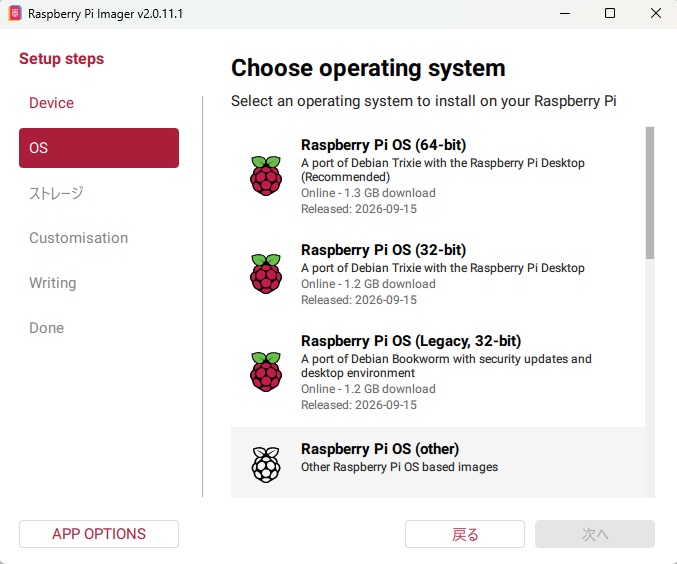 |
||
In this example, I selected Raspberry Pi OS Lite (64-bit). Lite has no desktop interface and is operated through a text terminal. It supports the Pi 3 Model B and suits this setup without a connected monitor. “Lite” does not mean that you cannot add features: you can install the software you need later. 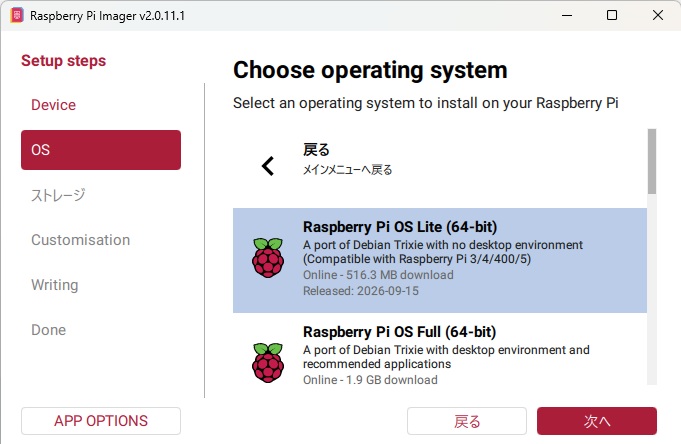 |
||
5. Select the destination cardInsert the microSD card into the card reader and connect it to your Windows PC. Select that card on the Storage screen. Check the displayed capacity and name to avoid selecting another USB drive or external disk by mistake. If you cannot identify the card confidently, disconnect any unnecessary external storage and select it again. 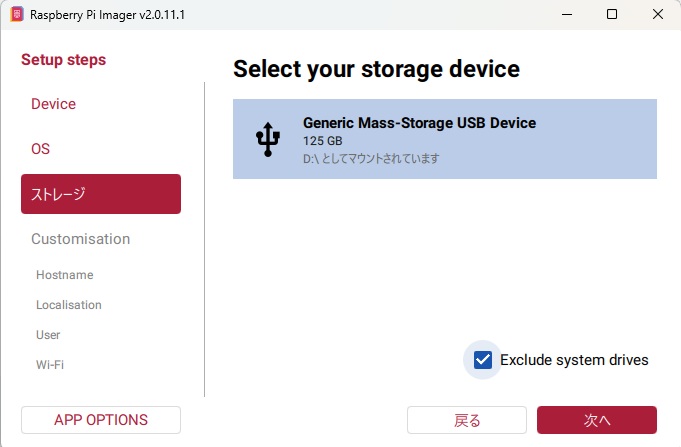 |
||
6. Configure the settings before first bootHostnameThe hostname identifies the Raspberry Pi on your network. For example, enter 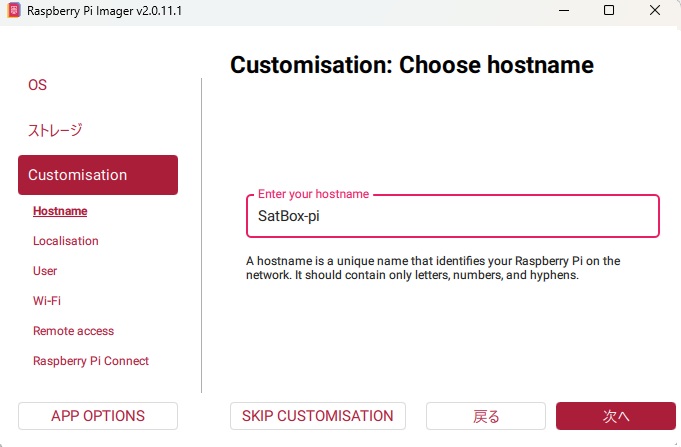 |
||
Location, time zone, and keyboardSet the location and time zone to match where you will use the Raspberry Pi. For example, use 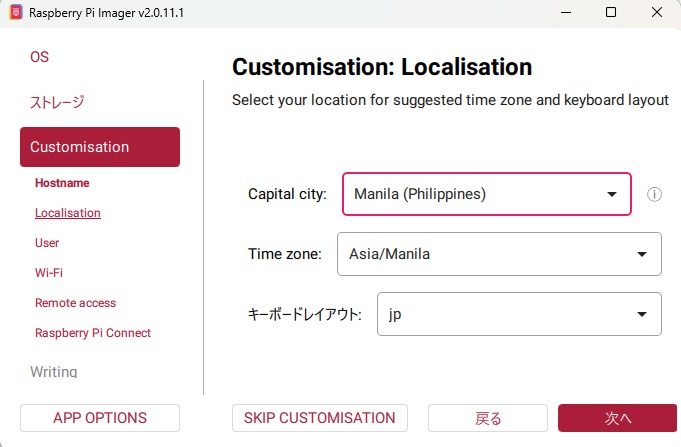 |
||
Username and passwordCreate a username and password for logging in. An example username is Keep a record of your settings and choose a password that is difficult to guess and different from those you use for other services. Treat any values shown in the screenshots as examples and enter your own settings. 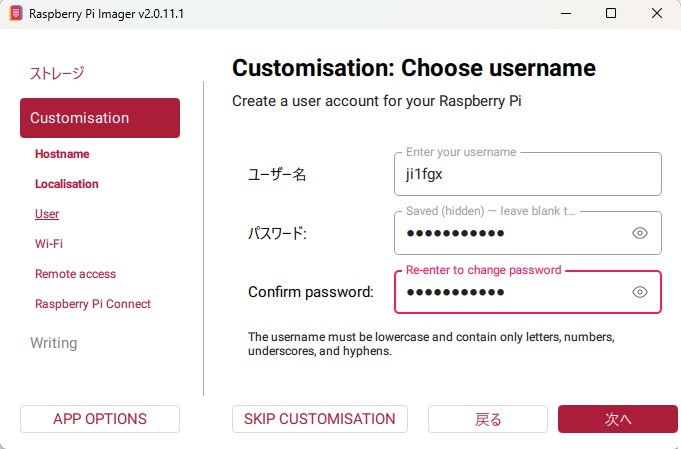 |
||
Wi-FiEnter the SSID (network name) and password of the Wi-Fi network you want to use. Even if Imager imports connection details from Windows, check that they match the network at the Raspberry Pi's installation location. These details are not always filled in automatically. The built-in Wi-Fi on the Raspberry Pi 3 Model B uses 2.4 GHz. It cannot connect to a 5 GHz-only SSID. Set the Wi-Fi country to match the installation location. If you will use Ethernet, you can skip the Wi-Fi settings and connect an Ethernet cable for the first boot. 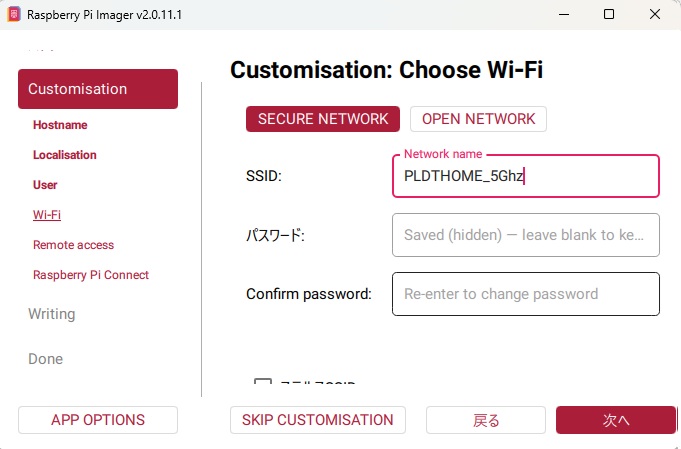 |
||
Enable SSHSSH lets you connect to the Raspberry Pi from another computer and run commands. Enable SSH so that you can operate it without a monitor. This guide uses password authentication with the user account created on the previous screen. If you prefer public key authentication, choose the option to register the public key from the computer you will connect from. 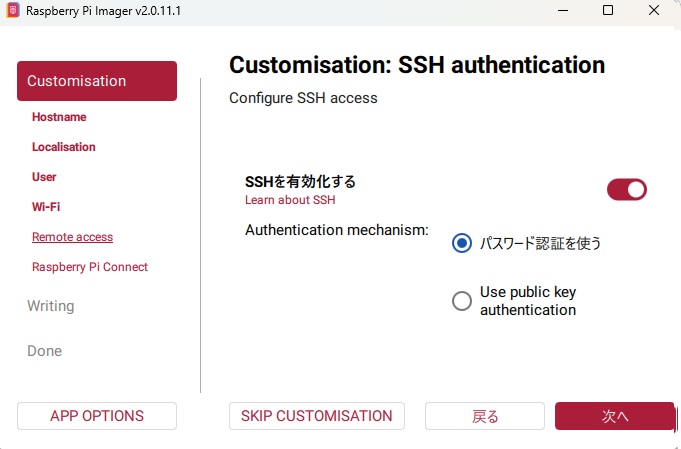 |
||
Raspberry Pi ConnectRaspberry Pi Connect is the official service for accessing a Raspberry Pi over the internet. For this setup, I plan to perform the initial configuration through SSH on the same LAN and install Tailscale afterward, so I leave Connect disabled. Disabling Connect does not prevent you from using the SSH access enabled on the previous screen. 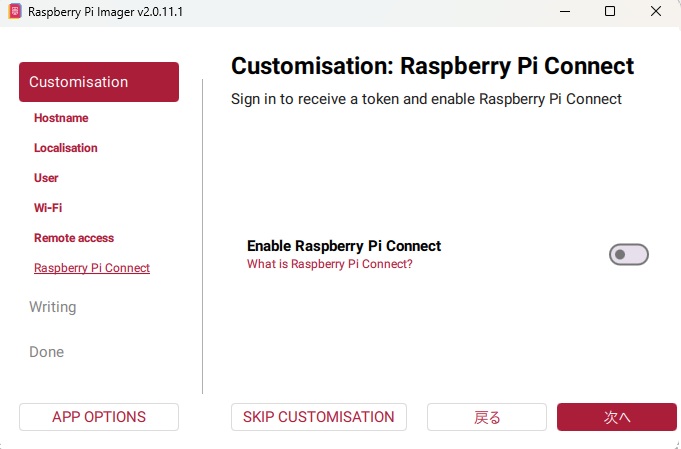 |
||
7. Review the settings and write the OSOn the review screen, check the Raspberry Pi model, OS, destination microSD card, and the settings you entered. If everything is correct, start writing. Imager downloads the OS and writes it to the card. 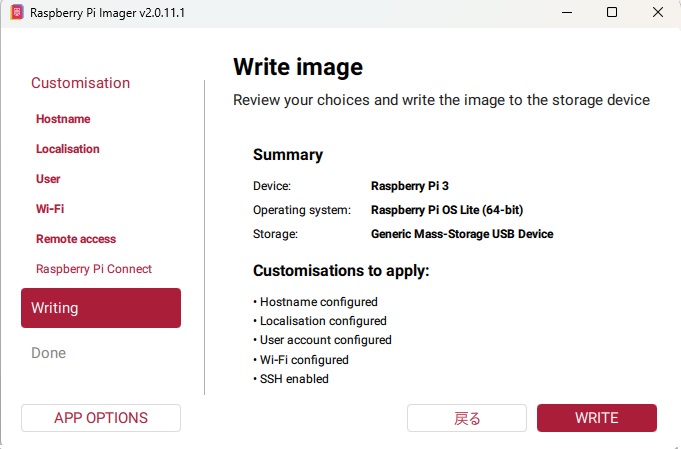 |
||
A warning explains that the data on the card will be erased. Check again that this is the microSD card you intend to erase before continuing. Do not remove the card or turn off the PC while writing is in progress. 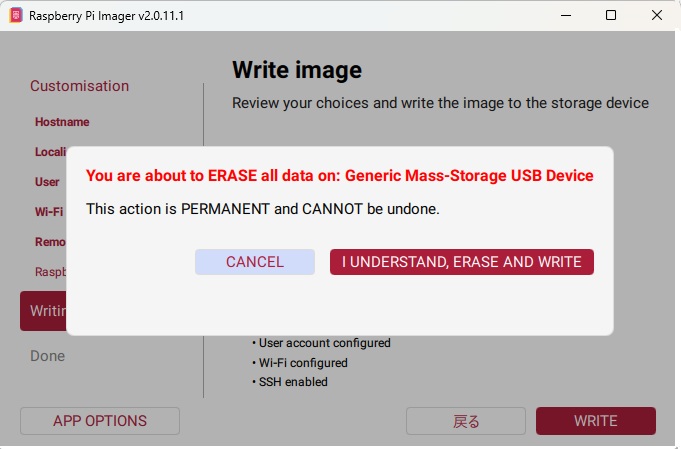 |
||
After writing, Imager verifies the data on the card. In my setup, downloading, writing, and verification took about 35 minutes in total. The time depends on your internet connection, card, and card reader. Wait for confirmation that verification has completed successfully, then safely eject and remove the card. If Windows asks you to format the card, cancel the prompt without formatting it. This can happen because Windows cannot read the Linux partitions written to the card. Your boot card is now ready. 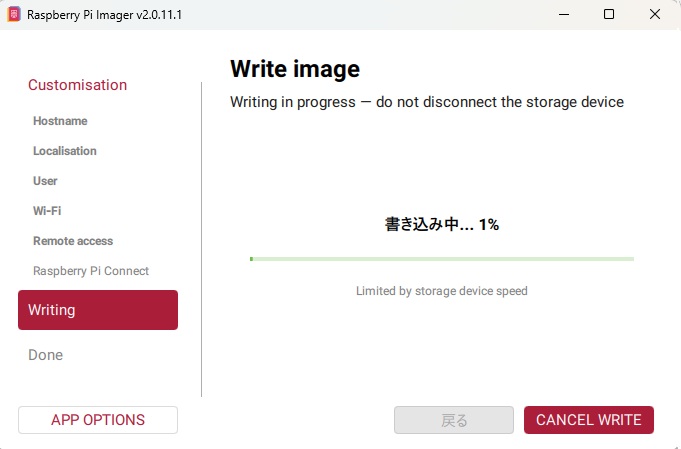 |
||
8. After purchasing the hardware: first boot and SSH connectionCarry out the following steps once you have the Raspberry Pi hardware. I have not yet tested this configuration on the actual device.
Replace If a prompt showing your username and hostname appears after login, the SSH connection has succeeded. Commands entered in this window will now run on the Raspberry Pi. If you cannot connect
9. Update the OS and shut down safelyAfter logging in, refresh the package list and update the installed software. Run the following commands one line at a time. Read the proposed changes and confirmation messages, then follow the prompts if you wish to continue. Restart after the update completes. Restarting disconnects your SSH session. Wait a little, then reconnect using the same SSH command. When you have finished and want to turn off the Raspberry Pi, use the following command. Wait for shutdown to finish before disconnecting the power supply. Shutdown may still be in progress just after SSH disconnects. Removing power or the microSD card while data is being written can corrupt files. Future plansFor budget reasons, I have postponed purchasing the Raspberry Pi 3 Model B and will continue using Tailscale on my laptop for now. Once I have the hardware, I plan to confirm startup, SSH access, and OS updates before installing Tailscale and configuring its connection. Writing the OS to the card alone does not make the VPN ready to use. References: Raspberry Pi official documentation: Getting started / Raspberry Pi official documentation: Remote access. The screenshots show the version of Imager used for this article. Item names and screen layouts may differ in other versions. |
||
| October 2, 2026 October 5, 2026 |