| English | Japanese |
|
Yesterdays access |
|
| Page Top | [Lily Diary.】 A diary of life in Mindanao. |
| 26/11/07 | SatBox_Ver0.1.1c-beta IC-9700 Test Version |
| 26/11/07 | SatBox User Guide |
| 26/11/03 | An FT-847 for SatBox Development |
| 26/11/02 | Buying a ZT219 Digital Multimeter |
| 26/10/28 | Building a home server using Linux |
| 26/10/27 | Repeater Controller Features and Settings |
| 26/10/27 | Repeater Controller Board and Firmware |
| 26/10/26 | JTDX Auto Run Ver0.7.7 |
| 26/10/26 | WSJT-X Auto Run Ver0.1.6 |
| 26/10/22 | Memories of UNIX and Networking from My Yonezawa Ham Shack |
| 26/10/20 | Acquiring a YAESU FT-2600M for a Repeater |
| 26/10/19 | Rotator Relay Interface for Sale |
| 26/10/18 | Kenpro Rotator Interface KiCAD DATA |
| 26/10/17 | JOTA in Indonesia: Jamboree on the Air |
| 26/10/17 | You Can Now Leave Comments |
| 26/10/11 | Installing Arduino IDE |
| 26/10/09 | DXCC200 Sticker Arrives from ARRL |
| 26/10/08 | SatBox Cloud Released |
| 26/10/06 | Bought an ECS LIVA Z Mini PC on Yahoo Auctions |
| 26/10/05 | QSO with C5R in The Gambia |
| 26/10/04 | Installing Raspberry Pi OS |
| 26/10/02 | Repeater Controller Features and Settings |
| 26/10/01 | Repeater Controller Board and Firmware |
| 26/09/30 | Ordering PCBs and Assembly from JLCPCB |
| 26/09/24 | UNITRUST Electronics Parts Shop |
| 26/09/22 | Kenpro Rotator Interface |
| 26/09/18 | SatBox KiCad PCB and firmware |
| 26/09/14 | designed a circuit board for SatBox |
| 26/09/12 | Solar Power System Plan |
| 26/09/09 | Satellite SatBox Part 4 |
| 26/09/04 | My grandson Zion |
| 26/08/29 | Ham Fair 2026 to be held |
| 26/08/25 | QSO with RI1FJL from Franz Josef Land |
| 26/08/23 | Satellite QSO via RS-44 |
| 26/08/22 | Currently, Satellite VUCC46 |
| 26/08/16 | Satellite SatBox Development in Progress - Part 3 |
| 26/08/05 | IC-820H Receiver Sensitivity Test |
| 26/08/02 | Satellite SatBox Development in Progress - Part 2 |
| 26/07/16 | Delivery of the 3D printed panels |
| 26/07/09 | Development of SatBox for satellites |
| 26/07/05 | Weather Monitor Indoor Unit |
| 26/06/30 | Creating data for 3D printers using FreeCAD |
| 26/06/16 | Installing an AS5600 magnetic encoder on a KR-500. |
| 26/06/05 | Grandson Zion's CQ |
| 26/06/04 | Replacing the potentiometer on the KR-500 elevation rotator |
| 26/06/03 | Making a Repeater Controller Pert4 |
| 26/06/01 | Weather Monitor software |
| 26/05/31 | Weather Monitor |
| 26/05/21 | JTDX Auto Run BUGFIX |
| 26/05/17 | Repair of satellite antenna system |
| 26/05/13 | Repair of Alinco DR130 |
| 26/05/07 | Making a Repeater Controller Pert3 |
| 26/05/03 | Indonesian satellite friend YC8RPK |
| 26/04/26 | DXCC200 achieved |
| 26/04/23 | Communication via ISS voice repeater |
| 26/04/20 | WSJT-X Auto Run Ver0.1.5 |
| 26/04/19 | Got an Alinco DR-130 |
| 26/04/15 | Clublog Charts |
| 26/04/10 | Regarding POC transceivers |
| 26/04/08 | Using KENWOOD AT-300 with YAESU radio |
| 26/03/17 | How to establish a radio club in the Philippines |
| 26/03/10 | KENWOOD AT-300 with YAESU radio |
| 26/02/27 | Philippine NTC Amateur Radio License Examination Question Bank |
| 26/02/20 | Package received from JK1SNS |
| 26/02/18 | Temporary License Renewal |
| 26/02/14 | Satellite Tracking Software SatTrack |
| 26/02/05 | Making a Repeater Controller Pert2 |
| 26/02/02 | CQ on satellite IO-86 |
| 26/01/27 | Shack & Repeater Controller |
| 26/01/16 | Making a Repeater Controller |
| 26/01/16 | Making aRotator Interface PCB |
| 26/01/10 | Satellite antenna installation |
| 26/01/08 | WSJT-X Remote Operation |
| 26/01/07 | JTDX Remote Operation |
| 26/01/04 | log_reciver_Ver2.6.6 |
| 26/01/04 | Tailscale VPN software for JTDX_Remote |
| Online Multiple Choice Reviewers to the Phil Amateur Radio Examination by 4F3EW A joint project by JI1FGX/DU9 and DV9JRD |
| SatBox Cloud Released (October 8, 2026) | ||
|---|---|---|
|
I developed SatBox Cloud, a service for predicting amateur satellite passes and receiving AOS alerts in a smartphone or computer browser. This web version of SatBox focuses on pass prediction and AOS alerts. It does not include radio Doppler control or antenna rotator control. No dedicated Android app is required. On iPhone, add the site to your Home Screen using Safari. Main features:
For example, your smartphone can receive the AOS time and peak elevation of RS-44 at the configured time before AOS. This is useful when doing other things while waiting for a pass. The service is currently in trial operation. AOS (Acquisition of Signal) marks the start of a pass when a satellite enters the observing range. LOS (Loss of Signal) marks the end when it leaves that range. A pass is one such transit. TLE (Two-Line Element) data describes satellite orbits and is used for pass prediction. For initial setup, follow this order: Create an account → Satellite selection → AOS notification settings → Notification devices → Send a test notification. Note: Web Push notifications and voice announcements within the page are separate features. Web Push requires device and browser notification permission and a network connection. Voice announcements work while the page is open and may stop when the screen is locked or the browser is in the background. Notification sounds, delivery times, and the number and spacing of repeated alerts depend on device settings and delivery conditions. |
||
Screenshot 1: Satellite pass predictionCheck satellite passes from your observing location using the map and pass list. The following screenshots explain registration and initial setup. 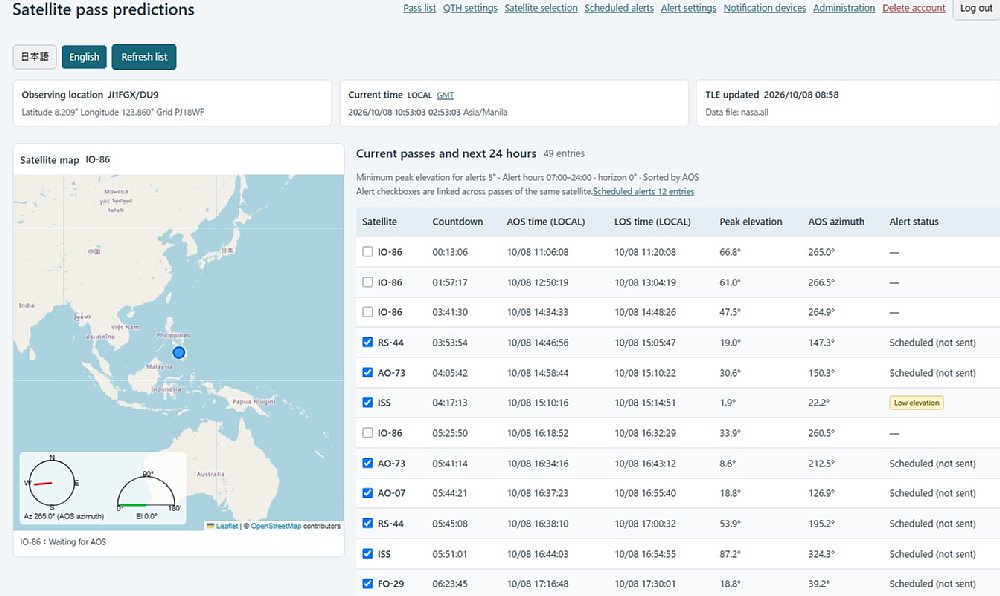 |
||
Screenshot 2: LoginOpen SatBox Cloud. If you are already logged in, the pass list appears. Select Japanese or English for the display language. Registered users should enter their login ID and password and click Log in. New users should follow the registration link to create an account. 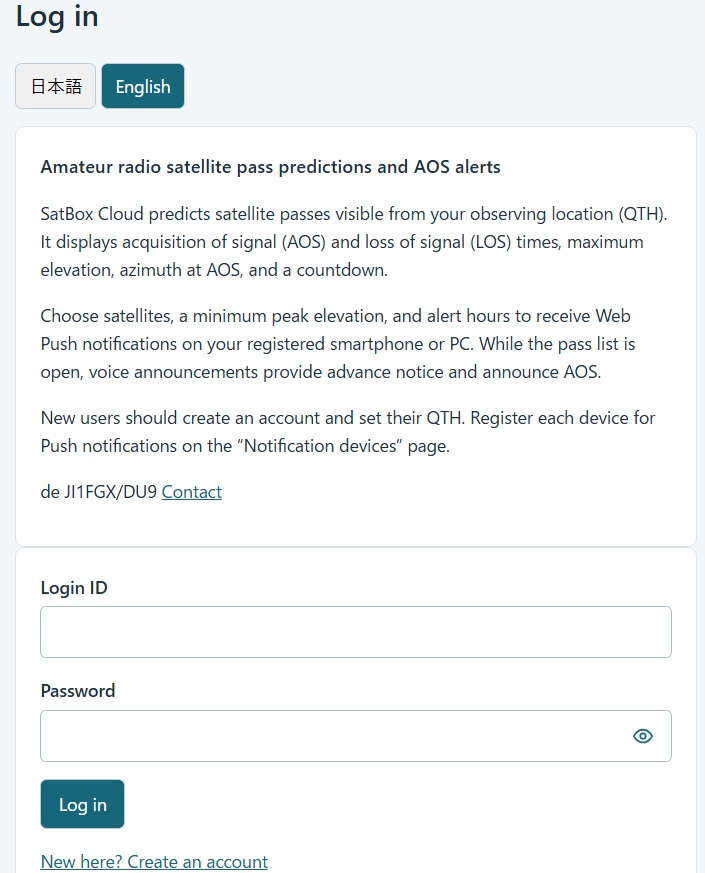 |
||
Screenshot 3: Create an accountEnter your login ID, password, password confirmation, and callsign. Passwords must be 8–128 characters long. Enter your observing location's latitude, longitude, altitude in meters, and time zone. Use positive values for north latitude and east longitude, and negative values for south latitude and west longitude. Use Asia/Tokyo for Japan or Asia/Manila for the Philippines. Leave the grid locator blank to calculate a six-character locator automatically from your coordinates. If entering it manually, use a 4-, 6-, or 8-character locator matching your location. Select a prediction period of 24 or 48 hours and click Create account and view passes. After registration, you can change your location and prediction period in QTH settings. 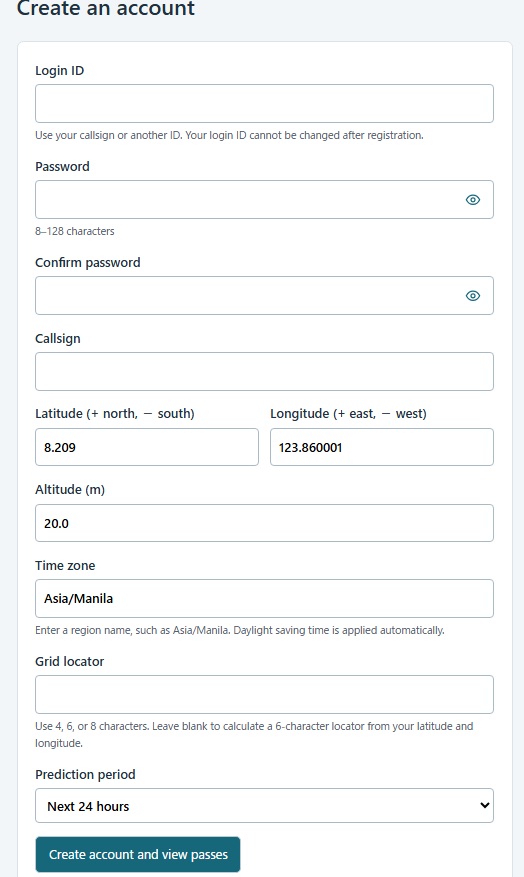 |
||
Screenshot 4: Main screenPasses in progress and upcoming passes are listed in AOS order. The list shows the countdown to AOS, AOS/LOS times, peak elevation, AOS azimuth, and alert status. During a pass, the satellite name and countdown turn red, showing the time remaining until LOS. Use LOCAL and GMT to switch AOS/LOS times between your location's local time and GMT (UTC). Alert hours always use the time zone in QTH settings, regardless of this display setting. The checkbox beside a satellite name turns alerts for that satellite ON or OFF. This setting applies to all passes of the same satellite, rather than only one individual pass. Passes outside the alert conditions remain in the list, with “Below minimum peak elevation” or “Outside alert hours” shown in the status. “Scheduled (not sent)” means a notification is scheduled; it does not confirm receipt. During the target satellite's pass, the map shows its position and visibility footprint. While waiting for AOS, you can check its AOS azimuth. The list updates every 60 seconds. Check the TLE update time, because older data may produce predictions that differ from actual pass times. |
||
Screenshot 5: Satellite selectionSelect satellites for pass prediction from NASA.ALL. Choose a satellite under Available satellites, then click > to add it to Selected satellites. Use < to remove it from your selection. >> adds all satellites; << removes all satellites from the selection. Click Save after making your selection. More satellites require more time for the initial calculation. This page selects which satellites to display; choose which ones generate alerts separately in Notification settings. 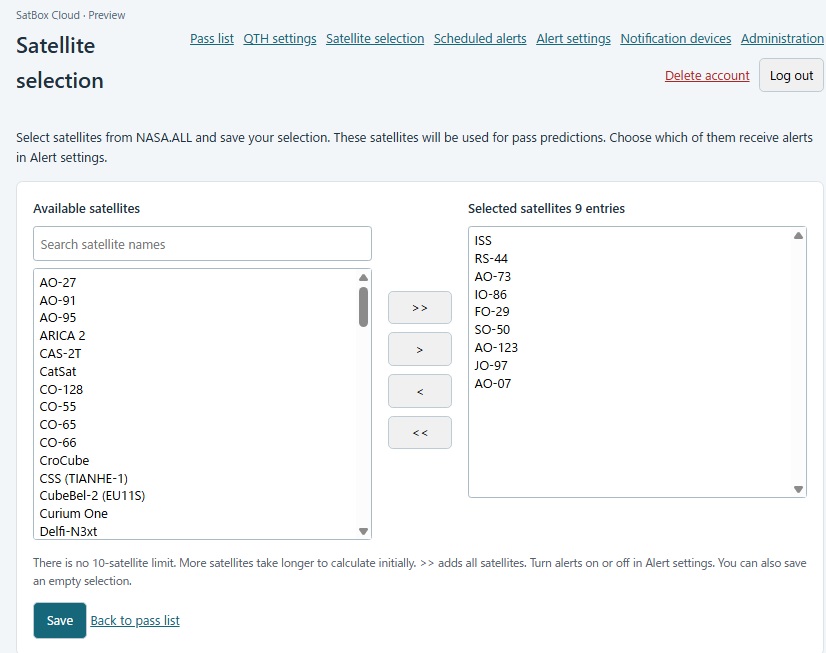 |
||
Screenshot 6: AOS notification settingsCheck the satellites you want alerts for from those chosen in Satellite selection.
Click Save and view scheduled alerts and check the scheduled alerts list. After registering your devices, click Save repeat settings and send a test notification to send a test to all devices registered to your account. Tests ignore alert hours and elevation conditions and can be sent once per minute. This button saves only the notification count and delay. Save changes to satellites, elevation, and alert hours using the upper save button first. 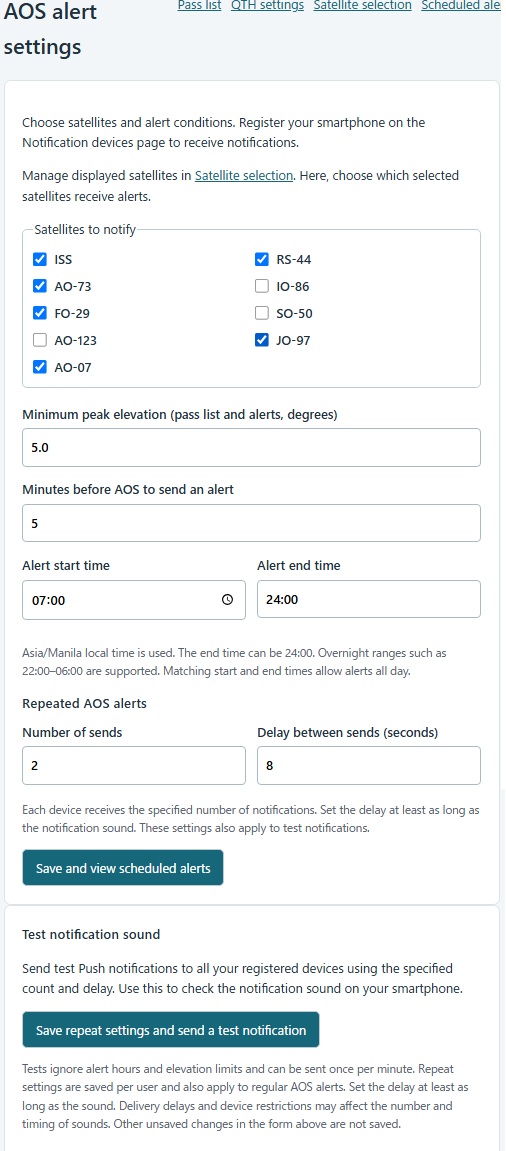 |
||
Screenshot 7: Notification devicesLog in to SatBox Cloud on the smartphone or computer that should receive notifications and open Notification devices. You cannot register another device on its behalf. Enter a recognizable device name, such as Smartphone or your callsign, and click Register notifications for this device. If prompted, choose Allow and confirm the device appears in the registered devices list. For multiple devices, log in with the same account and register each separately. To stop notifications, use Unregister notifications for this device or the removal button in the list. Send a test from Notification settings to check the display and sound. If notifications are blocked, follow the Android steps below to allow them. Notifications must also be enabled in your device's system settings. 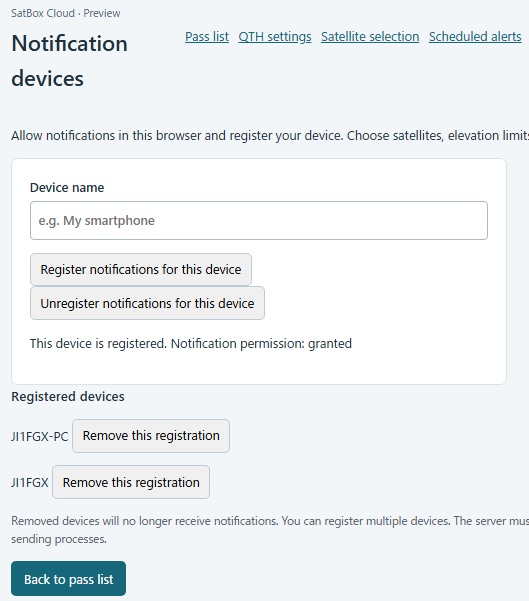 |
||
Screenshot 8: Allow notifications on Android (Chrome)If Notifications are blocked appears, tap the page information/settings icon to the left of Chrome's address bar. These screenshots show Chrome on Android. Labels and screen layouts may differ by device and version. 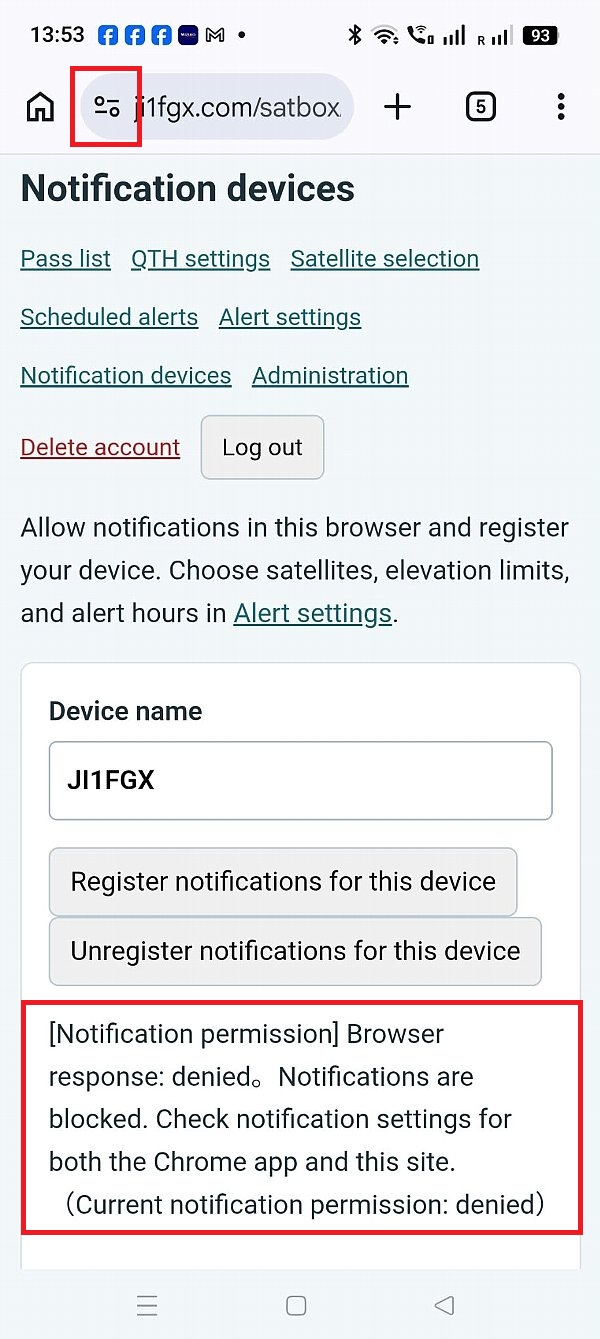 |
||
Screenshot 9: Open site notification settingsTap the item showing Notifications blocked. If Permissions appears, open it and select Notifications. 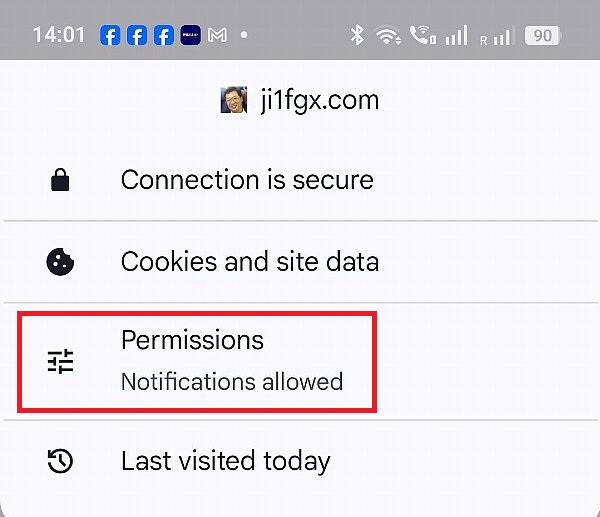 |
||
Screenshot 10: Change notification permissionsTap the notification item showing Not allowed to open its permission settings. 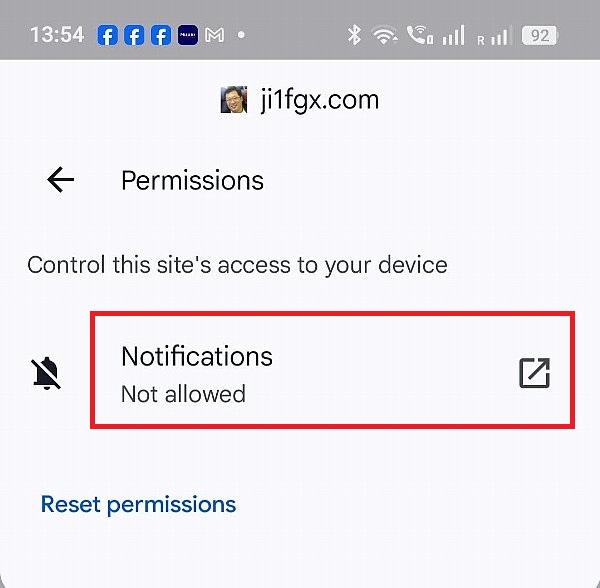 |
||
Screenshot 11: Allow notifications and register againTurn Allow notifications ON. If notifications for Chrome itself are disabled in your device's settings, enable those as well. Return to Notification devices in SatBox Cloud, reload if necessary, and click Register notifications for this device. Send a test notification to confirm reception. If there is no sound, also check notification volume, silent mode, and Do Not Disturb settings. 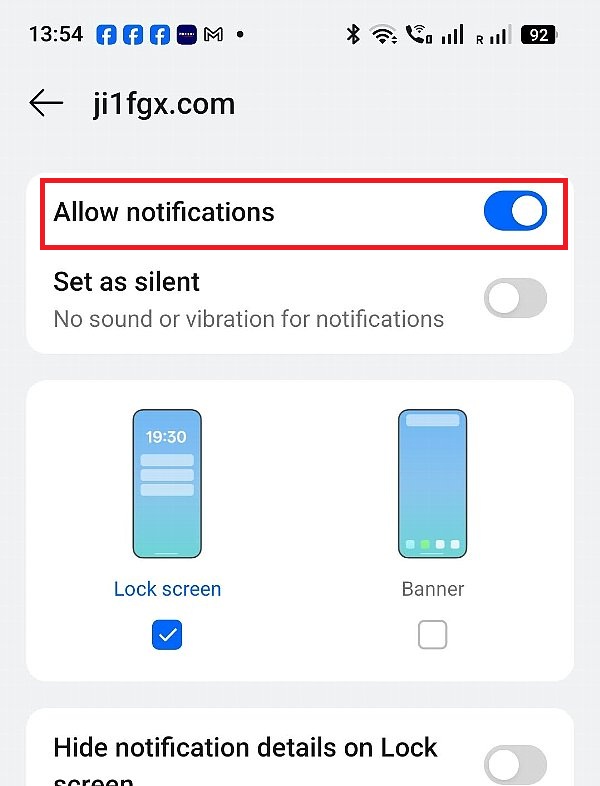 |
||
Receiving notifications on an iPhone
Web Push on iPhone is supported for Home Screen web apps on iOS 16.4 and later. Use the Home Screen icon rather than simply opening a regular Safari tab. References: Google: Chrome notification settings on Android / Apple: Add a website to your Home Screen / Apple: iPhone notification settings | ||
| October 6, 2026 October 9, 2026 |