| English | Japanese |
|
|
Yesterdays access |
| Page Top | [Lily Diary.】 A diary of life in Mindanao. |
| 25/12/28 | Article search now available on smartphones |
| 25/12/10 | KR-500 terminals Modification |
| 25/12/06 | Installation of satellite poles |
| 25/12/03 | Installing KR-500 on Kenpro KR-400 |
| 25/11/20 | Satellite tracking Sat Track - Development Version |
| 25/11/19 | Kenpro KR-400 arrived by EMS |
| 25/11/18 | 3.5MHz Antenna Toroidal Core |
| 25/11/16 | WiMO V/UHF Cross Yagi |
| 25/11/16 | WSJT-X Automatic operation Ver0.1.1 |
| 25/11/09 | Eyeball with DU9JJY in Cotabato |
| 25/11/04 | TNC software for APRSVer1.2 |
| 25/11/03 | Indonesian satellite IO-86 event |
| 25/10/29 | Active Satellite List |
| 25/10/24 | FTDX3000 repair completed |
| 25/10/17 | Kenpro KR-500 Repair Completed |
| 25/10/15 | ARISS SSTV DIPLOMA |
| 25/10/14 | International Space Station Information |
| 25/10/13 | ST2 interface for driving AC motor rotors |
| 25/10/12 | Received APRS signals from ISS |
| 25/10/11 | TNC software for APRS manual |
| 25/10/10 | TNC software for APRSVer1.0 |
| 25/10/09 | Making myopia glasses |
| 25/10/09 | ICOM IC-820H PLL UNLOCK repair |
| 25/10/05 | 435MHz Cross Yagi antenna production preparation |
| 25/10/04 | Receiving SSTV from the International Space Station |
| 25/10/03 | Repair of elevation rotator KR-500 |
| 25/10/02 | 145MHz Cross Yagi antenna production preparation |
| 25/10/01 | received APRS signal from ISS |
| 25/09/29 | CQ WW RTTY contest |
| 25/09/27 | SSTV from the ISS |
| 25/09/26 | WARC band fan-out antenna |
| 25/09/25 | levation rotator KR-500 acquired |
| 25/09/23 | APRS TNC software Dire Wolf with Hamlib |
| 25/09/23 | TNC software direwolf |
| 25/09/21 | Russian satellite RS-44 beacon |
| 25/09/20 | Installing a radio in a car |
| 25/09/17 | DH1NGP Peter radio vehicle |
| 25/09/13 | 3.5MHz SWR increased |
| 25/09/12 | 3.5MHz Zepp antenna adjustment |
| 25/09/10 | Geostationary satellite QO-100 |
| 25/09/09 | Preparing for the satellite station |
| 25/09/08 | DU9JJY satellite station |
| 25/09/07 | 14MHz late at night |
| 25/09/03 | Mitsubishi Strada Pickup Truck Oil Change |
| 25/08/18 | WSJT-X Automatic operation Ver0.1.0 |
| 25/08/18 | JTDX Autonomous operation Program Ver0.6.3 |
| 25/08/10 | Software List |
| 25/07/26 | AutoCWType_Ver1.5.8 |
| 25/07/20 | Create one month's worth of ADIF files from JTDX Ver 2.6.5 |
| 25/07/19 | Japan's Radio Wave Usage Tax |
| 25/07/13 | IARU HF Contest |
| 25/07/10 | Software updates |
| 25/07/08 | DXV500ZS linear amplifier repair |
| 25/07/07 | CQ Machine Program |
| 25/06/21 | LoTW system upgrade |
| 25/06/18 | RG8 for 3.5MHz arrived |
| 25/06/15 | Time setting Ver0.5 |
| 25/06/14 | Drone Habsan ZINO arrives |
| 25/06/12 | Philippine Independence Day |
| 25/06/11 | Algeria 7X2RF QSL card. |
| 25/06/10 | Translation API Program |
| 25/06/09 | DXCC150 award certificate arrived |
| 25/06/08 | AutoCWType_Ver1.4.1 |
| 25/06/07 | Introducing the Shack |
| 25/06/06 | A portrait drawn by ChatGPT. |
| 25/05/26 | Windows full-width/half-width switching. |
| 25/05/17 | OK2ZAW BCD to 16 converter. |
| 25/05/16 | For 3.5MHz Zepp antenna. Stepping motors |
| 25/05/15 | 3.5MHz stepping motor design. |
| 25/05/14 | 3.5MHz tuning coil installed. |
| 25/05/11 | 3.5MHz antenna installation completed. |
| 25/05/03 | JTDX Autonomous Driving Program Ver0.4.3. |
| 25/04/26 | Drone Habsan ZINO. |
| 25/04/25 | Time setting Ver0.3. |
| 25/04/24 | AutoCWType_Ver1.3. |
| 25/04/23 | Preparing for FTDX3000 LCD repair. |
| 25/04/22 | Installation plan for 3.5MHz Zepp antenna. |
| 25/04/21 | AutoCWType_Ver1.1. |
| 25/04/20 | 10,14MHz antenna installation completed. |
| 25/04/19 | JTDX Autonomous Driving Program Ver0.4.1. |
| 25/04/19 | 14MHz antenna pole installed. |
| 25/04/18 | ThinkPad X390 repair completed. |
| 25/04/17 | Search is now possible. |
| 25/04/15 | Preparing the 10MHz dipole. |
| 25/04/12 | Hexbeam Part8. |
| 25/04/06 | My ThinkPad X390 is broken. |
| 25/04/05. | Time setting program. |
| 25/03/31 | JTDX Autonomous Driving Program. |
| 25/03/30 | Automatic log sending from CWType to Hamlog. |
| 25/03/21 | Hexbeam Part 7. |
| 25/03/20 | FreeDV Part 3 First QSO. |
| 25/03/18 | FreeDV Part 2 QSO in the shack. |
| 25/03/16 | Hexbeam Part 6. |
| 25/03/15 | Install FreeDV Part1. |
| 25/03/09 | Hexbeam Part5. |
| 25/03/07 | Hexbeam Part 4. |
| 25/03/05 | 28MHz antenna modification |
| 25/03/01 | FTDX3000 is broken! |
| 25/02/28 | Pileup at 50MHz FT8. |
| 25/02/28 | DXV500ZS linear amplifier repair. |
| 25/02/27 | Tower pipe rebuilding plan. |
| 25/02/26 | Direction to Japan from Ozamiz. |
| 25/02/26 | 28MHz is not available. |
| 25/02/23 | DXV500ZS linear amplifier repair. |
| 25/02/22 | Hexbeam Part 3 |
| 25/02/21 | Hexbeam Part 2 |
| 25/02/18 | 28MHz antenna construction. |
| 25/02/17 | 18,24MHz antenna height construction. |
| 25/02/16 | Z26NS Cosovo. |
| 25/02/14 | 21MHz FT8 |
| 25/02/12 | 7,21MHz antenna repair. |
| 25/02/08 | Operating CW at 21MHz. |
| 25/02/05 | DXV500ZS linear amplifier failure. |
| 25/01/19 | Input Director. |
| 25/01/14 | Temporary license renewal. |
| FreeDV Part1 installed (2025/03/15) | ||||||||||||||||||||||||||||||||||||||
|---|---|---|---|---|---|---|---|---|---|---|---|---|---|---|---|---|---|---|---|---|---|---|---|---|---|---|---|---|---|---|---|---|---|---|---|---|---|---|
| refusal After installing FreeDV, I have been able to transmit, but have not been able to make contact at this time. I cannot hear any signal at all on any of the bands. I'm still trying to figure out if there's something wrong with the settings. |
||||||||||||||||||||||||||||||||||||||
| In a Facebook conversation, I learned about something called FreeDV! I found this page In the middle of that page, you'll see "About the current versionClick on the link "Click on the link You can download it from the "Available Binary Releases" section further down on the page that opens 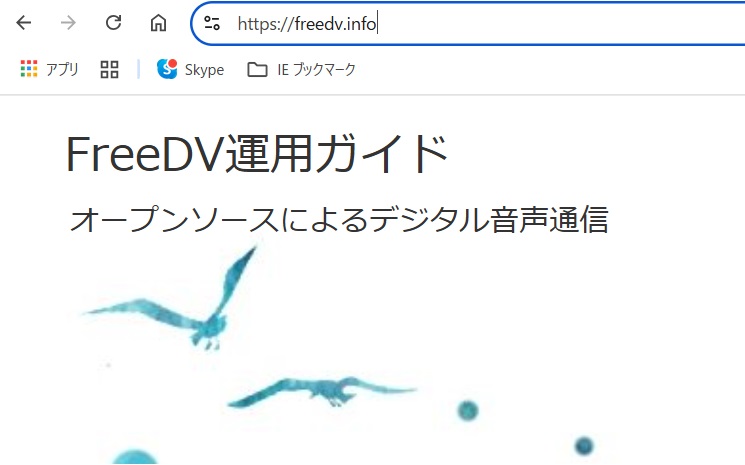 |
||||||||||||||||||||||||||||||||||||||
Clicking on the downloaded file will launch the installer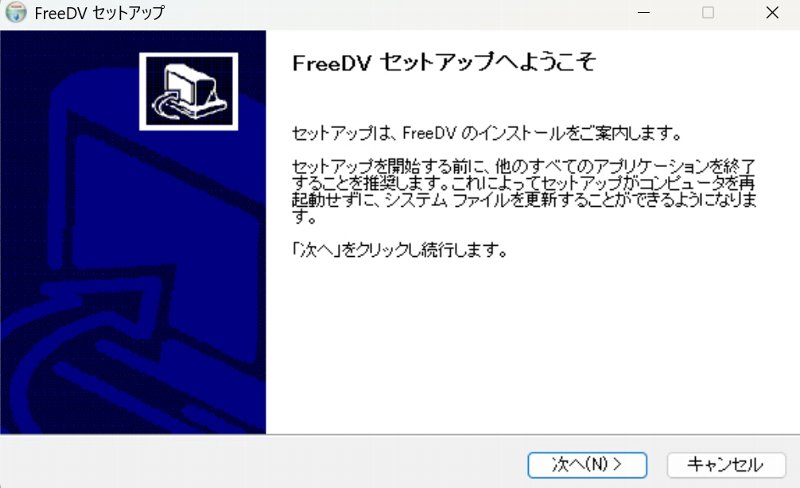 |
||||||||||||||||||||||||||||||||||||||
Press "Next" to proceed with a few things, including where to install the software.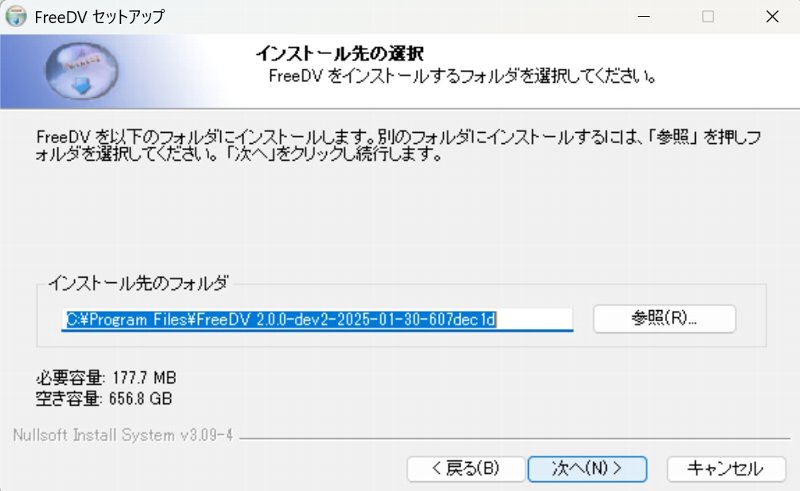 |
||||||||||||||||||||||||||||||||||||||
| Press "Install" and after a while the Python installation will start. The first time you install it, it will take a while here, but just wait. 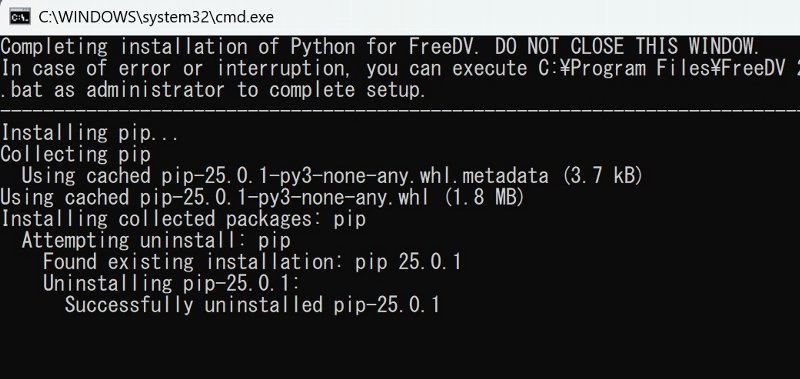 |
||||||||||||||||||||||||||||||||||||||
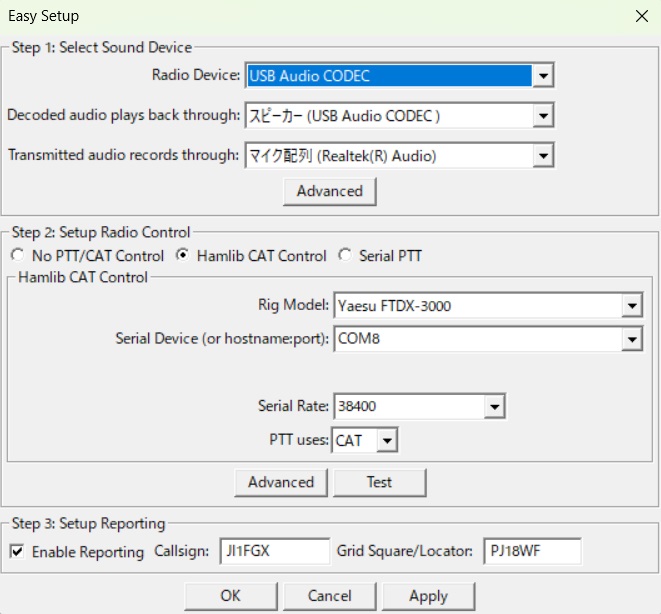
| Before starting FreeDV, switch the DATA mode setting of the FTDX3000 from the menu. Menu 67 MODE DATAPSK to OTHERSswitching over to |
||||||||||||||||||||||||||||||||||||||
After installation is complete and FreeDV is started, Easy Setup is launched
|
||||||||||||||||||||||||||||||||||||||
| After setup, you will see this Waterfall screen Select Mode, then select the frequency in ReportFreq(MHz) and press Start button to start reception. Looking at FreeDV Reporting, Mode seems to be RADEV1 Maybe it's just my computer, but the mouse cursor stops responding for a few seconds after I press Start. 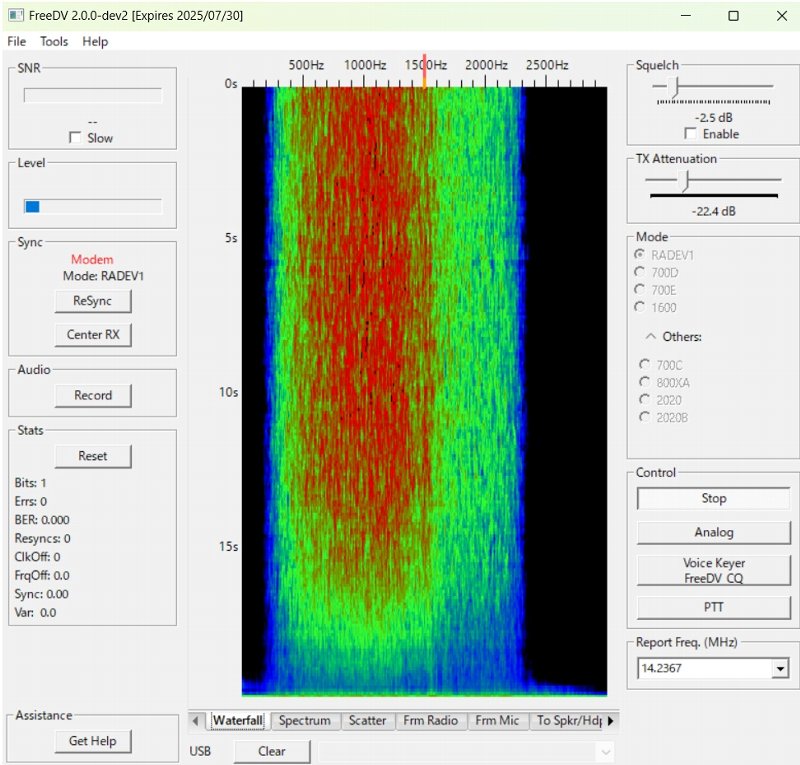 |
||||||||||||||||||||||||||||||||||||||
Spectrun Screen |
||||||||||||||||||||||||||||||||||||||
| Select [Tool]-[FreeDV Reporting] to see the band When Track is checked, the frequency automatically switches to the frequency selected on the main screen. 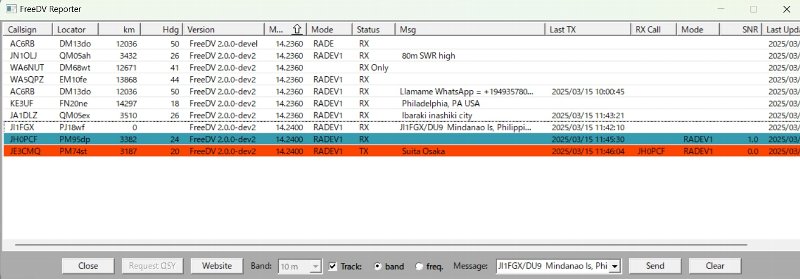 |
||||||||||||||||||||||||||||||||||||||
Your own voice monitored by From Mic |
||||||||||||||||||||||||||||||||||||||
Right-click on the PTT and select "Monitor Transmitted audio" to monitor your voice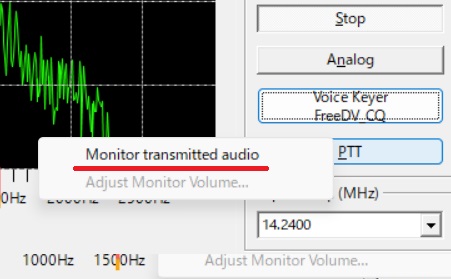 |
||||||||||||||||||||||||||||||||||||||
| Right click on Voice Keyer/FreeDV CQ and select "Record new voice keyer file". You can record your own CQs, etc. You can also click on Voice Keyer/FreeDV CQ to send out the recorded voice.  |
||||||||||||||||||||||||||||||||||||||
| March 09, 2024 Mar. 16, 2025 | ||||||||||||||||||||||||||||||||||||||